Ive used it a bit since then and its definitely a practical addition to any backpack.
The problem is its starting to show signs of aging. The can expands and contracts, and there is now a crease where extra gas flows giving an uneven flame.
In my model (also not my design) I used an inner sleeve with holes at the top to let the gas out. The result is that the trapped ethanol (spirit/alcohol/methanol) between the outside wall, and the inner wall boils the spirit, and creates a gas jet that looks a lot like a normal BBQ burner.
One of the problems was trying to get the top of a coke can to fit into the bottom of a coke can. Its tricky because (of course) they are the same size. It can be done, but involves gently stretching the outside one and it takes a lot of messing about.
Now Im being pretty fussy here. The little burner works really well, but it did tend to leak fuel around creases that formed in the join between the top and the bottom sections.
Someone on a Stirling engine forum pointed me towards a different method of making one. This method involves no holes, but it just encourages those creases that mine developed by itself, and I think it might be a winner.
Theirs also used a drink can, but I think it might make a more robust version if I used a tinned food can.


I needed the top to fit into the bottom, so the first thing to do was punch a hole in it to enable a cutting tool to get in there.
I used that mystery tool that pocket knives have.
Probably a leather working tool or something.
Who knows, just punch a hole in the can.

My tin snips are stupid, so I ended up using scissors.
This isnt the best way to use scissors, so dont do this at home unless you actually own the scissors.
 One very good method of cutting a tin can, is to just tear it by grabbing a ragged tail of tin with a pair of pliers and twist. If theres a groove to follow, it actually makes a pretty straight cut.
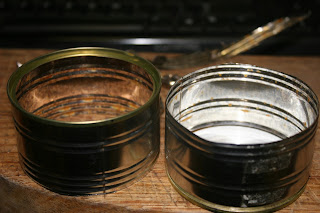
I made the inside sleeve (the one on the left), slightly taller than the other so the pot could sit on the rim and let the gas escape from the gap between the outside sleeve.

This was simply a case of grasping with pliers, and twisting them to the left, and slightly down toward the centre.


0 comments:
Post a Comment