Showing posts with label stove. Show all posts

Rocket Mass Stove

Ive mentioned this before, but this is such a neat way to heat that I wanted to make an entry just for Rocket Mass Stoves and include the best videos and links I have found.  

Paul Wheaton from Permies.com demonstrates in this first 2 minute video just how efficient the Rocket Mass Stove is.  You see this video frame here where this lady has her face over the flue pipe.  The heat and fumes from the flue are warm not hot and very clean.  I hope you will explore the videos at  Permies.com.  It is one of my favorite sites!


Efficiency is the key to heating a green house.

This simple low tech stove with exceptionally high efficiency is something anybody could build.
Why do we continue the spend thousands on air tight stoves that pollute and burn more wood?


http://tinygreenlove.blogspot.com/2012/02/amazing-rocket-mass-heater.html


Below is another favorite video educator.  Rob Torcellini shows the details of how he built a Rocket Mass Stove to heat his greenhouse.  The same stove could heat your house.

Add a self feed bin for pellets!  This is how Rob did it.

Rob has taken the Rocket Mass Stove to a very sophisticated level. His excellent engineering skills and preparations while building his green house have payed off well.

Hear are some more ideas


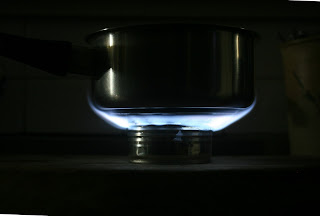
Ive included this video because it demonstrates the effectiveness of a rocket mass stove


Read More..

Making smoked foods Original rib ideas 0 Plagiarism 1

I just found out that my "Luxury cut ribs" idea wasnt original.

It seems that not only is there a competition BBQ circuit, but on it you might find something called "Hollywood cut ribs" which have an uncanny resemblance (being identical) to Luxury cut ribs.

Oh well.

Im still holding out hope for Frenched luxury cut ribs as my one contribution to the carnivorous, and our deep-seated need to cook stuff on charcoal.  


Read More..

Fire Quicker more durable ethanol stove

A while back I made a pretty convincing ethanol camp stove out of a coke can.

It worked well and looked like this when it was running.

Ive used it a bit since then and its definitely a practical addition to any backpack.

The problem is its starting to show signs of aging. The can expands and contracts, and there is now a crease where extra gas flows giving an uneven flame.


In my model (also not my design) I used an inner sleeve with holes at the top to let the gas out. The result is that the trapped ethanol (spirit/alcohol/methanol) between the outside wall, and the inner wall boils the spirit, and creates a gas jet that looks a lot like a normal BBQ burner.

One of the problems was trying to get the top of a coke can to fit into the bottom of a coke can. Its tricky because (of course) they are the same size. It can be done, but involves gently stretching the outside one and it takes a lot of messing about.

Now Im being pretty fussy here. The little burner works really well, but it did tend to leak fuel around creases that formed in the join between the top and the bottom sections.

Someone on a Stirling engine forum pointed me towards a different method of making one. This method involves no holes, but it just encourages those creases that mine developed by itself, and I think it might be a winner.

Theirs also used a drink can, but I think it might make a more robust version if I used a tinned food can.

So, to start with, I peeled a normal, every day food tin.


The first step was to trim it to size.

I needed the top to fit into the bottom, so the first thing to do was punch a hole in it to enable a cutting tool to get in there.

I used that mystery tool that pocket knives have.

Probably a leather working tool or something.

Who knows, just punch a hole in the can.


Next jam in some tin snips or something to make a nice cut to separate top from bottom.

My tin snips are stupid, so I ended up using scissors.

This isnt the best way to use scissors, so dont do this at home unless you actually own the scissors.


One very good method of cutting a tin can, is to just tear it by grabbing a ragged tail of tin with a pair of pliers and twist. If theres a groove to follow, it actually makes a pretty straight cut.


As I said, I ended up using scissors to trip everything to it was nice and neat.

I made the inside sleeve (the one on the left), slightly taller than the other so the pot could sit on the rim and let the gas escape from the gap between the outside sleeve.


I bent a series of grooves in the base of the inner sleeve so that they would allow the flow of gas, and also allow the inside sleeve to fit inside the outside sleeve.

This was simply a case of grasping with pliers, and twisting them to the left, and slightly down toward the centre.


Next I inverted the inside sleeve and carefully positioned the outside sleeve over it so that I might press the two together by stamping down with my foot.


Which failed completely.
Read More..

Making smoked foods Frenched luxury cut ribs

I thought I was pretty clever when I came up with cutting ribs so that ever second bone was removed. I called it "luxury cut ribs". This is always enormously popular with people at a BBQ.

But now I think Im even more clever.

Cleverer.

I frenched every rib, but at opposing ends.

Luxury cut, but with a handle.

A genuine meat popsicle.

Bam!


Read More..

Fire Tin can stove success

I decided to make another tin can stove with the new design, but this time I thought Id make it work.

A major design flaw of the first attempt was not actually the bit where the tin ripped in two, but was actually the bit where I was thinking upside down.

The previous version had grooves that would only reach the bottom.

That was never going to work.


This time I made the grooves in such a way as they would still be grooves when they reached the top.

Much more likely.

So, the top (open ended) half of the can is bent like this, and made to sit into the bottom (still with the base on) of the can.


All up this process takes only 5 minutes or less.

The zig-zag bit is placed zig-zag down into the half on the left.

It doesnt even need to be a snug fit.

Just drop it in place.


The result is, that when you light the alcohol and wait a few seconds for the device to heat up, it vaporizes the spirit within the zigs and the zags of the two walls created by the can halves, and is emitted as gaseous fuel through the top of the (now inverted) zig-zag bits.

Like this.

Perfect!

And quick.

A quicker, more durable ethanol stove.

A total success.


Much better than the last attempt.

Thanks to whoever first thought of this method of making a little spirit stove, that enable the happy camper to knock out a stove within a few minutes of dumping a cans contents into a pot.

Now all I need is canned food that actually tastes good.

And perhaps the ability to make a tin can.

I have no idea how to make a tin can.

But Im not going to make a can as a "Thing" because nothing good ever came out of a can.


120 Things in 20 years - No can was hurt in the making of this post.


And sweetened condensed milk comes in a can, and that stuff is delicious.

But I still dont want to learn how to make a can.


Read More..