I was stymied about how I was going to carry the water from my 1000 gph pump back to my four growbeds. Id looked into 1" no-kink pond tubing and associated fittings/valves, but the tally was getting pretty pricey.
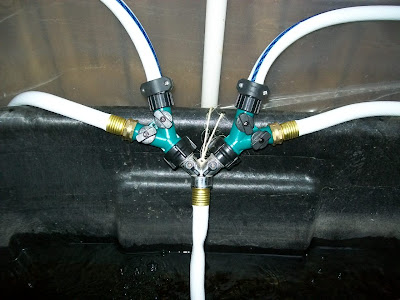
When I was first plumbing the 1000 gph pump in for just 2 growbeds, I figured garden hose might work - and if I was wrong, I would only be out the price of a single length of hose and a single splitter (with built-in ball valves). Garden hose ended up working fine for just two growbeds.
I still wasnt sure garden hose would work for the full-up system, particularly with the long (23) lengths needed to reach each of the two growbeds on the opposite side of the greenhouse from the sump. But I was willing to try. Turns out garden hose works like a charm. I even have to throttle the flow just a tad.
Youll want to get hose that is safe to use for drinking water, because regular hose can leach lead into the water. This set-up requires 60 feet of hose, so you could either get a single 75-foot hose (~$40 via Home Depot, search "lead-free hose") or two 50-foot hoses (~$23 each via Home Depot, search "neverkink boat hose"). You can get free shipping if your total order is over $50, assuming your local store doesnt have these hoses in stock.
Auto Top Up - Think Water Cooler
In watching Murray Hallams "Aquaponics: The First 12 Months," I saw his contraption for automatically adding water when the tank gets low - like the ballcock older toilets use to shut off flow into the bowl when its full of water after a flush. He had his hooked to the home-owners water spigot. My only trouble was I couldnt find the exact configuration at my local hardware store, and googling ballcock with my computers kid-friendly browser settings made finding anything online even harder.
Since I currently have goldfish in the sump, and plan to use the sump for small fish, I dont want my sump to run dry. Even if I couldnt find the exact contraption Murray uses.
I came up with the idea of a water reservoir, like a water cooler. I use the standard 5-gallon bottles to do this. I cut the neck off the bottom bottle and drilled 1" holes into the sides to allow tank water in.
Next I add 1/2 teaspoon of Amquel to an empty 5-gallon bottle, then fill with tap water. The Amquel removes chlorine and other nasty stuff from the tap water.
Finally I invert the regular 5-gallon bottle and rest it in the top in the modified bottle.
As the water in the system evaporates, the water in the 5-gallon reservoir glugs out, bit by bit. I anticipate this will make adding water a weekly chore and eliminate risk that my sump runs dry without me noticing.
Construction of a Kiddie Cover
I dont have kids that could/would drown in 20" of water, but Kiddie Covers make the fish happier. Bluegill, at least, dont like to be without cover (fear of predators that might scoop them out). Plus bluegill are known for jumping out of the tank (lost one myself that way).
I just used cheap 1x3 for the covers, supported by frames made of inexpensive 2x3. This picture showed in this post has a close up of the more complicated sump tank lide, which has a cut-out for the 5-gallon reservoir.
Finally, below is a link to some video footage I shot today. The first video is really long (over 12 minutes) showing how the kiddie covers work, feeding fish, how the CHOP plumbing works, the final bell siphon design, and the top-up tank.
The second video is 3 minutes long and explains how I plumb the water to the growbeds on the opposite side of the greenhose (and talks about my solar oven).
floating raft (plants floating with their roots in a constant stream of water)
media-based growbeds (plants growing in some sort of rock/sand/gravel/beads)
Media-based systems are recommended for home hydroponicists because they are simpler and more reliable. Media-based systems are also referred to as flood and drain. The idea is you flood the growbed with the fish water (delivering nutrients and, um, water), then let it drain out (bathing the roots in air/oxygen).
Of the various ways to flood/drain a media-based growbed, the one that is easiest on the checkbook is a bell siphon. All a bell siphon needs are simple plumbing bits available at any hardware store. Oh, and a small pump. I loved the way the folks at ecofilms explain it:
"If the pump is the heart of an aquaponics system, then the auto-siphon are it’s lungs. A vital part of kit. Remember when you were a little kid and the teacher told you about the regular flooding of the Nile river and how fertile the Nile delta was to early farmers. Well think of the auto siphon as a kind of similar concept. It’s main purpose is to flood the grow bed drawing rich oxygen into the depths of the trough, oxygenating the plant roots and turbo charging the bacteria to do their thing."
They created a great animation of how a bell siphon works. A real-life system takes many times longer to fill than the time to drain (my system takes 10 minutes to fill and 1 minute to drain, ignoring the dribbly parts at the beginning and end of the siphon). Also, the pump never turns off. I found the growbed in my system only needs 10 gallons to fill the spaces between the rocks, so the change in the level of the water in the fish tank is only 2-3 inches, about 10%.
Though I love the idea of "constant height of pond" (CHOP), the added complexity and space to achieve CHOP didnt make sense for my 3x5 system. Let me tell you the bits I used to create the system Ive got.
First is the pump - 140 gallon Pondmaster that I got from a local hardware store for under $40. It has only one moving part and consumes just 10 watts. Its like having a night light plugged into a wall socket, as far as energy usage is concerned.
Next are the plumbing bits (I presume the kind of handyman attempting this will already have saws and drills, etc.). The plumbing bits are:
1) The outer sheath or media guard. Its the white tube poking up through the gravel in this picture.
This is 3" (ID) pipe roughly 1 long with dozens of 1/4" holes to allow water (but not rocks) to reach the siphon. I drilled down 12 lines, putting a hole every inch and precisely staggered the holes on adjacent lines because Im OCD. But the regular holes also serve as a crude measuring stick, helping me determine critical distances. Turns out a 15.5 oz can fits nicely inside this sheath, to prevent rocks from falling in from above. Plus a can adds iron to your system as it rusts - useful as most fish food lacks the kind of iron levels wed like to have in foods we eat.
Update - Turns out you can simply cut slices in the media guard - slices also work just fine for the base of the bell. FWIW, I use a crochet hook to pull the bell out of the media guard when I want to check the siphon.
2) The bulkhead. I used 3/4" electrical PVC fittings here, because the electrical fittings are dirt cheap and adequate to this low-pressure task. I was inspired by Richard Kinchs post"An Improvised PVC Bulkhead Fitting forLiquid Storage Tanks. I only used the PVC male and female electrical conduit adapters - I didnt need to modify them in any way. This part of my system drove me to 3/4" piping, because the 1" adapters have seams running up through the threads and dont seat nearly as well. As 3/4" is the size of standard bilge pump line, I figured it was large enough for my purposes.
I used a 1" bit to drill the hole through the bottom of my grow bed, and a doorknob hole cutter to drill a hole in the shelf for the drain. You can improve the seal through the grow bed with silicon or you can simply use a #18 o-ring. I used aluminum foil tape to seal the edge of the hole through the shelf just in case there were a leak, to mitigate moisture getting into the wood and turning it soft.
3) The 1" to 3/4" reducer and standpipe. I struggled long and hard on this bit, inspired by Affnans Bell Siphon video:
My problem is that Im in the US, so I cant get the metric bit parts he uses for his system. I settled on a 1" slip to 3/4" male threaded reducer/adapter, followed by a female threaded to female slip coupler.
The two bits together cost about $1. Turns out the 1" female slip adapter has an inner diameter of 1-5/16" (to accommodate the added wall thickness of 1" pipe). A 1-5/16" diameter circle is three times the area of a 3/4" diameter circle - meaning your siphon thinks the pump is putting out 3 times as much flow as it actually is. So 3 times as much water hits your 3/4" pipe to start the siphoning action with the 1" to 3/4" reducer than the pipe would see if it was just a flat cut. This is a good thing. Trust me.
If you like math and physics, you can go read up on Bernoullis principle, which comes into play here. Just dont tell the helpful people at the hardware store you are putting together a plumbing fixture that creates a Bernoulli suction. My limited sample shows consistent brow-furrowing and eyebrow raising.
Youll need a short length of 3/4" pipe to connect the reducer to the bulkhead so the top of the reducer is about 1-2" below the top of your gravel. Since your bed will flood to the top of the reducer and no higher, the 1-2" layer of dry gravel keeps algae from growing on the surface of your gravel. Heres a picture of the assembled upstand (reducer through bulkhead) next to the bell.
4) The Bell. This is a 2" pipe with an end cap.
I cut six 1/2" holes in a ring around the bottom, leaving about 1/4"-1/2" of material between the edge of the holes and the end of the pipe. Then I used a hack saw and 10" miter saw to remove all but three "legs." Just above each leg, I drilled a 1/4" hole, then added a fourth 1/4" hole above these. These four 1/4" holes help break the siphon when the grow bed is drained by allowing air to fill the top of the bell.
Update - Ive found that cutting slices in the bottom of the bell about an inch above the bottom works just fine. Its also quieter than my bell that had the drilled holes.
5) The gravity run. This is the part that I fiddled with the most. If the gravity run has no kink, its possible that water will just sheet down the sides of the pipe, leaving a tube of air straight from the bottom of the run to the top of the bell that will prevent the siphon from ever forming. If the gravity run has too much kink, youll never get enough air to the top of the bell to break the siphon. Below is the gravity run that has worked best for me so far - with a 45 degree kink:
Update - the 45-degree angle is great. You do need to insert a bit of pipe in the bottom, even if its only 1/2-inch long, because the upper edge of the lower pipe is part of what kicks the water and creates the siphon. Heres another picture, showing a siphon drain in my constant-height-of-pond system. Ive got the exit coming out at or below water level, so the slices in the lower tube allow air in to break the siphon when the growbed has drained completely.
Im creating a pdf of instructions with photos for the whole assembly, and will update this post with a link when Ive got it done.
Anticipation makes the reality all the sweeter. The past few weeks have been like Christmas, aquaponics-style. Stopping by the store for a few minutes, just to make sure the shelves were in stock... Malingering in the plumbing aisle, making sure the bits fit... Sitting down to watch "Aquaponics made Easy" with my youngest and jotting down ideas...
It is all the anticipatory fun of the holidays without the stress of tradition and obligation.
And sometimes the anticipation pays off.
I planned to buy my 3/4" river rock from Home Depot. It wasnt going to cost much: just $50 for 14 bags @ $3.50/bag.
Then I drove by Sislers Stone - a place Ive driven past (and been driven past) since I was teeny.
I figured it had to be cheaper to buy stone from a wholesale place. Plus I could just fill up my 50 gallon tank to exactly the right level. There was only one downside. I would need to buy the gravel sooner (before plumbing the growbed) rather than later.
This was a downside?
Today was gorgeous: bright, warm, dry - the kind of day that vies for one of the top ten days of the year. A perfect day to shovel gravel. Sislers calls it "river jack," which is a Delaware stone. Colors range from off-white to shades of grey to some reds.
For those of us (like me) whove never bought bulk stone before, it works like this.
Drive onto the scales to weigh your vehicle before you add the stone.
Drive down into the stone yard and load up with your stone of choice.
Drive back to the scales where they measure you again, with the stones.
Park and pay the nice people.
Im going to go back out and enjoy the rest of this beautiful day. Tomorrow I will talk about the shelving, with a picture of how the system looks assembled.
There are so many options how to flood and drain a media-based aquaponic system. I thought Id mention a few of the options that have tempted me.
Timer-based flood. The idea here is that you flood your growbeds for 15 minutes each hour (a standpipe in each bed prevents the beds from overflowing). When the pump turns off,the water drains back into the fish tank. Pure simplicity.
15 minute timers can be found at Home Depot for $15. You have to find a pump that will push the full volume of your tank out to the growbeds in 1/4 of an hour. For my case, with a 100 gallon tank, that means Id necessarily need a 500 gph pump.
A downside is you are draining your tank by whatever amount of water fits between the media in your beds. In my case, it seems a 50 gallon growbed takes ~10 gallons of water to the top of the standpipe. Even if I had four 50 gallon growbeds hooked up to my system, Im only sucking out 40% of the water volume. So Im not draining the tank dry, but it will be more crowded during those fifteen minutes.
Constant Height of Pond (CHOP). With a CHOP system, you let the growbeds drain into a sump tank. A single pump in the sump tank pumps water to the fish tank, which then "overflows" into the growbeds. The growbeds use bell siphons to ensure the beds both flood and drain. The fish tank is always at the same level, minimizing stress on the fish.
Australia-based Murray Hallam announced an update to the CHOP system in October 2010, where the water from the sump is pumped out to both the fish tank and the grow beds. The fish tank overflows to the sump tank. This system yields all kinds of benefits, including the ability to have beds at different heights and the ability to add constant flood beds. If I had more space, Id be loving on this as an option. Alas, Im stuck in my tiny area.
Murray Hallams New CHOP2 System
Modular Fish Tanks. One reason I chose not to go with the CHOP2 idea is the problem of getting a 200+ gallon tall fish tank into a basement room. However, San Diego-based Tilapia Mama has a kit that converts four 55 gallon drums into a 200 gallon "Backyard Fish Farm (BFF)." If your space allows, you can use one of these BFF units as the tall fish tank for a CHOP 2 system, and you can lower your growbeds from the 48" top height Ive got in my standard 3x5 system.
Tilapia Mamas Backyard Fish Farm
Indexing Valves. These are so cool. Each time you turn off the water, the valve switches to a new port. These were just invented a few years ago and are sold by K-rain and Fimco for irrigation.
TCLynx animation of an Indexing Valve
Florida-based TCLynx of Aquaponics Lynx has pioneered the use of indexing valves for aquaponics. She modifies the basic indexing valve with a "gravity stem" so it can be used in low pressure systems, and is the only source I know of for the modified valves appropriate for aquaponics. The animation below shows an indexing valve being used to sequentially irrigate multiple growbeds from a single pump and fish tank.
Four growbeds flooded using a single pump and indexing valve
In order to use one of these indexing valves, you have to have something that stops the flow for a minute or more before starting the flow up again. While you could use the 15 minute timer, a repeat timer will allow you to shut the flow off for just a minute (I found cheap repeat timers on eBay for $30).
The modified indexing valve doesnt require the pressure youd use in an irrigation system, but it still needs something like a 1000 gph pump to get the valve to work "right," according to TCLynx - a great option if you are looking at a 300-600 gallon fish tank.
What I Plan to Do. I love the indexing valve. Id honestly love to use it.
But.
I only have space for four 50 gallon grow beds, five max. Im probably going to make do with two 100 gallon fish tanks, connected with piping so they stay at the same level. A 250 gallon pump would cycle all the water each hour, though Ill probably bump it to 350 or 500 to make sure theres enough flow to run the bell siphons. That will be only 6-11 watts per growbed to irrigate each growbed.
Right now I cant justify the added power, complexity or space to do CHOP, CHOP2, or use the indexing valve thats sitting on my desk. And since Ive got a bell siphon design that works like a champ, I have no reason to opt for the timer option.
So its simple bell siphons for me - at least until something changes to make more advanced technology/complications the obvious solution...