Showing posts with label and. Show all posts

Pump plumbing Topping Up and Kiddie Covers

Using garden hose to carry water from the sump


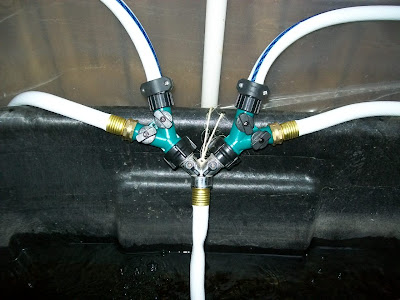
I was stymied about how I was going to carry the water from my 1000 gph pump back to my four growbeds. Id looked into 1" no-kink pond tubing and associated fittings/valves, but the tally was getting pretty pricey.

When I was first plumbing the 1000 gph pump in for just 2 growbeds, I figured garden hose might work - and if I was wrong, I would only be out the price of a single length of hose and a single splitter (with built-in ball valves). Garden hose ended up working fine for just two growbeds.

I still wasnt sure garden hose would work for the full-up system, particularly with the long (23) lengths needed to reach each of the two growbeds on the opposite side of the greenhouse from the sump. But I was willing to try. Turns out garden hose works like a charm. I even have to throttle the flow just a tad.

Youll want to get hose that is safe to use for drinking water, because regular hose can leach lead into the water. This set-up requires 60 feet of hose, so you could either get a single 75-foot hose (~$40 via Home Depot, search "lead-free hose") or two 50-foot hoses (~$23 each via Home Depot, search "neverkink boat hose"). You can get free shipping if your total order is over $50, assuming your local store doesnt have these hoses in stock.

Auto Top Up - Think Water Cooler


In watching Murray Hallams "Aquaponics: The First 12 Months," I saw his contraption for automatically adding water when the tank gets low - like the ballcock older toilets use to shut off flow into the bowl when its full of water after a flush. He had his hooked to the home-owners water spigot. My only trouble was I couldnt find the exact configuration at my local hardware store, and googling ballcock with my computers kid-friendly browser settings made finding anything online even harder.

Since I currently have goldfish in the sump, and plan to use the sump for small fish, I dont want my sump to run dry. Even if I couldnt find the exact contraption Murray uses.

I came up with the idea of a water reservoir, like a water cooler. I use the standard 5-gallon bottles to do this. I cut the neck off the bottom bottle and drilled 1" holes into the sides to allow tank water in.

Next I add 1/2 teaspoon of Amquel to an empty 5-gallon bottle, then fill with tap water. The Amquel removes chlorine and other nasty stuff from the tap water.

Finally I invert the regular 5-gallon bottle and rest it in the top in the modified bottle.

As the water in the system evaporates, the water in the 5-gallon reservoir glugs out, bit by bit. I anticipate this will make adding water a weekly chore and eliminate risk that my sump runs dry without me noticing.

Construction of a Kiddie Cover


I dont have kids that could/would drown in 20" of water, but Kiddie Covers make the fish happier. Bluegill, at least, dont like to be without cover (fear of predators that might scoop them out). Plus bluegill are known for jumping out of the tank (lost one myself that way).

I just used cheap 1x3 for the covers, supported by frames made of inexpensive 2x3. This picture showed in this post has a close up of the more complicated sump tank lide, which has a cut-out for the 5-gallon reservoir.

Finally, below is a link to some video footage I shot today. The first video is really long (over 12 minutes) showing how the kiddie covers work, feeding fish, how the CHOP plumbing works, the final bell siphon design, and the top-up tank.

The second video is 3 minutes long and explains how I plumb the water to the growbeds on the opposite side of the greenhose (and talks about my solar oven).


Read More..

We has bluegills and shellcrackers!!

FishWagon, aka Arkansas PondStockers


Spending $10 for less than a pound of catfish on Thursday increased my appetite for buying my outdoor fish.

I knew the Fish Wagon [aka Arkansas PondStockers] was going to be at the Manassas Southern States Coop Friday. So I went for it. I picked up 25 hybrid bluegills, 50 redear, and a pound of minnows - all for less than $60. I plan to pick up a handful of catfish in a month or two, when Ive got the 300 gallon tank in place.

I know Im doing it all backwards. But having the fish in the tank, crying out for the greenhouse to be built, has made clearing a couple of trees an emergency. Mere planning for a greenhouse would have allowed the hard tree-clearing part to get delayed for weeks, months, years.

Trees are down now, with a small bit of bad news. Apparently my greenhouse cant be taller than the brick wall at the end of my property. Which would make the greenhouse, I dont know, like 48" tall. The lady purveying the unhappy news did make some helpful suggestions that might work, though. And my greenhouse design can be scaled to whatever height is allowed.
Read More..

Making smoked foods Brining and smoking

It seems that brining is really important.

Its soaking food in a salt water solution.

Gratuitous smoked rib shot from last night
From here on in, it gets a little hazy.

Last night I made a brine of water sugar and salt. Id tell you the proportions, but I dont know what they are. It started with a half cup of rock salt and a half cup of brown sugar, and around two litres of water. But then I added some more water so I really have no idea.


Luckily, my recipe or lack there of isnt the point of this post.

This is...

Apparently brining initially adds salt to the cells in the food, then when the solution is a bit depleted, a cell might have more salt than the surrounding brine, so it starts to draw in water. From what Ive read, it might be worthwhile to figure out when that transition takes place, and remove the brine once the cells have started to turn towards taking on water, and replace it with a flavoured liquid instead of just the brine.

With this in mind, I spent a reasonable amount of time probing my whole chicken in brine with the probes of my multi-meter.

Its been an odd night.

It stands to reason that the changing salt content might change the resistance of the chicken. Resistance measures how conductive something is. Im pretty sure salt water conducts better than pure water, and less sure that perhaps pure water might not conduct electricity much/at all. Either way, there might be something useful to be gained from sticking probes into chicken.

Wikipedia says this on the subject (on conductivity, not on probing chickens)...

--------------------------------

from...  http://en.wikipedia.org/wiki/Purified_water#Electrical_Conductivity


Electrical Conductivity

Electrical conductivity of ultra-pure water is 5.5 × 10?6 S·m?1 (18 M? cm in the reciprocal terms of Electrical Resistivity) and is due only to H+ and OH- ions produced in the water dissociation equilibrium.[7][8] This low conductivity is only achieved, however, in the presence of dissolved monoatomic gases. Completely de-gassed ultra-pure water has conductivity of 1.2 × 10?4 S·m?1, whereas upon equilibration to the atmosphere it is 7.5  × 10?5 S·m?1 due to dissolved CO2 in it.

--------------------------------

Im not really sure why it says that. Im guessing it means something to someone, but I think its roughly agreeing with me.

So...

With this in mind, it might be possible to detect the point at which the food stops taking in salt, and starts taking in moisture.

Currently Im at the stage in my research where I find it annoyingly difficult to get a good reading. The harder you press the probes, the better chicken conducts. Im guessing this is just because theres more chicken exposed to the current, because theres more probe exposed to the chicken.

So for my next trick, Il be concentrating on the brine and its conductivity because I can completely submerge the probes, and as a result, I might get more consistent readings.

Im also at two more stages.

One is not being sure what I should be looking for in the readings. ie how whats happening should effect the conductivity of the readings.

And the other is wondering if perhaps I should just have a bit of a lie down, and forget the entire episode.


120 Things in 20 years - Maybe the reason aliens are always probing things is because they are trying to ascertain the correct procedure for brining and smoking everything. Aliens like making smoked foods.

Read More..

Thinking 懐かしい

????


Now theres a word we need an English equivalent to.

Why is my native language so incomplete? 

I want my money back!


120 Things in 20 years is slightly disappointed!

Read More..

A List of Double Up Food Bucks Locations in Albuquerque and Valencia County


Thanks to an initiative approved by the State Legislature this year, New Mexicans who receive food stamps can use their EBT cards to double the amount of fruits and vegetables they purchase at growers markets. Here is a list, courtesy of the New Mexico Farmers Marketing Association, of locations in the Albuquerque area and Valencia County that offer the Double-Up Food Bucks option.
  • ABQ Uptown Growers’ Market 2200 Louisiana Boulevard NE, Albuquerque (Saturdays 7AM–12PM)
  • Albuquerque Downtown Growers’ Market Central and 8th, Robinson Park, Albuquerque (Saturdays 8AM–12PM)
  • Albuquerque Growers’ Market at Presbyterian 1100 Central Ave. SE, Albuquerque (Tuesdays 7AM–12PM)
  • Albuquerque: Rail Yards Market 777 1st St. SW, Albuquerque (Sundays 10AM–2PM)
  • Belen Growers’ Market Anna Becker Park, Highway 309 & Reinken Avenue, Belen (Fridays 4:30–7PM)
  • Bosque Farms Growers’ Market 1090 North Bosque Loop, Bosque Farms (Saturdays 8AM–12PM)
  • Los Lunas Farmers’ Market 3447 Lambros Circle, Los Lunas (Tuesdays 4PM–7PM)
  • South Valley Armijo Village Growers’ Market Isleta Blvd. and Arenal Rd. SW, Albuquerque (Saturdays 8AM–12PM)
  • South Valley Gateway Growers’ Market 100 Isleta Blvd. SW, Albuquerque (Thursdays 5PM–8PM) 
  • Zia Bernalillo Farmers Market 335 S. Camino del Pueblo (Fridays 4pm-7pm)
Double-Up Food Bucks benefits are also available in Alamogordo, Aztec, Cuba, Carlsbad, Clovis, Dixon, Española, Farmington, Las Cruces, Las Vegas (Tri-County Farmers Market), Lordsburg, Mescalero, Mora, Pojoaque, Portales, Ramah, Santa Fe, Silver City, Socorro, Truth or Consequences (Sierra County Farmers Market), Taos and Tucumcari. Click Here to find specific information about each of these markets. 
Read More..

Grow Towers and Deep Water Culture

The humble plastic pail with my keys on top

I picked up some barrels from Nova Barrel. Today I wanted to show you what Im doing with these nifty square 4.5-gallon pails. Next week Ill show you the compost barrel, the black soldier fly harvester, and the potato barrels...

Ive played around with deep water culture, sometimes called "floating raft." But you dont have to have a floating raft. You just need to be able to keep the plants roots in the "nutrient solution."

For now lets hit the trust button that I know how to plumb this into my system. I find Im better at showing than telling, so let me show you what Ive done so far.

Pail with holes and net pots

I pulled out my 2-1/4 inch hole saw (the same one you use to cut holes in doors for doorknobs). Turns out this is the perfect size for one of the standard sizes of net pots. I drilled four holes in the corners of the pail lid. Ive already wedged the net pots into the holes in the picture above.

I also drilled small holes in the center of the pail lid. These will allow water to drip into the pails. Below is a picture of the pail with a 3 foot vertical grow tower resting in the center.

Grow tower supported by the pail

Ill be plumbing these into my system sometime in the next week. Ill fill the net pots and tower pockets with hydroton, then planting can begin.

You could do this with regular round 5-gallon pails. There are lots of pail-based deep water culture systems out there, though I dont think Ive seen any connected to an aquaponics system. I like the square pails because they have a flat side that will work well with the home-made grey plastic bulkhead fitting I use for the rest of my through-wall plumbing.

Heres a sketch showing how Ill achieve constant height of water in my pails (think Durso Siphon or Standpipe). A crate structure will support the flat sides of the pails and block some of the light that will otherwise get to the roots. Ill anchor an EMT loop in the crate structure to hold the grow towers upright and support the piping for the water coming in from the sump.

Sketch of aquaponic vertical tower/deep water culture concept
Read More..

Thinking Theoretical economic Anthropology and the Gold star Standard

One of the problems I see in the western world is its dependence on reward.

The internet seems a little better than the real world in this respect, but I suspect its because we dont see the takers doing the taking. We just see the givers being generous. The nature of the stuff up for grabs means that if you take more than you give, theres still exactly the same amount left for everyone else. Open source software is a good example. 

Ive taken much, much, more from the net than I can ever give, but all the stuff Ive taken is still there. 

Which is nice.

But in the real world you take some stuff, and theres not as much left for the next in line. And sometimes there isnt even a line*.  Ive been lucky enough to have spent my formative years living in Papua New Guinea. To say anything about Papua New Guinea is to be wrong about most of it, but Ill say some stuff about it anyway. 

When I was in Papua New Guinea, I was there at a time when the locals were making the transition from the cultures and lifestyles they had been enjoying for the last few dozen centuries, to one that looks and tastes a little more like you might expect in a western city. One of the problems with shifts like this is the clash between the old economic system and the new. From this point is should be noted that when I talk about some attribute of Papua New Guineas culture, I refer to only the bits I know. There are something like a third of the worlds languages (or something) dont quote me)). and many more cultural ... things... paradigms? Anyway. every few hundred people are different. They talk different, they look different, they believe different, and they think different. Not just different as compared to me, but different from all the other different groups. I knew a fishing net merchant who could easily pick a persons birthplace to within a hundred kilometres or so, just by meeting them over the counter. Often with much greater accuracy to the point where they could name the village. Anyway...   One of the most interesting things about the culture clash was the gradual decline in the worth of generosity. Or at least my perception of that decline. There seemed to be some kind of social credit that a person could gain by simply giving stuff away. You might get something back from acts of generosity, but it might not come from the person you gave things to. You still see this in the west in small groups, but once you get to a certain population level, one where everybody can no longer know everyone else, the system breaks down. There comes a point where giving stuff away is no longer useful. 

And here I come to my point...

When youre little, you gain respect and trust within your family and friends, you are rewarded with new responsibilities, freedoms, and smiles. 

You dont need gold stars gummed to your work. 

I think gold stars (or points for Hufflepuff) might be encouraging our kids to seek only monetary reward, or perhaps an Oscar. 

I think we should stop it. 


120 things in 20 years thinks the best part about not being an academic, is that I have no need to quote sources, and I get to say whatever I want. 


*A line has just one characteristic. Its endedness. Two** ends, but just one characteristic. A list of people who can make the most noise from lowest volume to highest could be seen as another line, and often making the most noise gets you first grab at whatevers going. (see baby birds in nests, and political lobbyist)

** a circle is a line with no end. I guess that means I mean a "queue".  


Read More..

Hurricane Irene Before and after

The Garden - Before Irene

I took the plastic cover off my greenhouse a long time ago for two reasons:

1) It was getting blasted hot inside the greenhouse, even though I never got around to installing the "ends" on my greenhouse.

2) My plants were running into the 5-foot 2-inch roof.

The garden did great topless all summer, even with me being absent for weeks on end. But Hurricane Irene was set to arrive off my coast around midnight last night. Predictions were rainfall of 2 to 6 inches and winds of 20-60 mph.

I mainly worried about the rain. I didnt want my system to flood and overflow.

Worst case if my system flooded was the water level in my sump would overflow the lip of the sump tank. The goldfish in my sump probably wouldnt even get washed out of the system. Unless I developed a clog in the piping between my fish tank and sump, the fish tank wouldnt overflow. Even with a clog, the cover on the tank will keep the fish inside.

Long term, adding as much as 6 inches of rain water to my tank could throw off the water chemistry. Not sure how much of an impact that would have since the fish and plants are so well balanced and I have no ammonia, no nitrite, and low levels (ppm) of nitrate in the system right now.

Wind could do a number. My growbeds are filled with hydroton, which in itself doesnt anchor the plants well. I do have 2 inches of gravel in the base of each growbed, but Im pretty sure that wont help against tropical storm winds.

To mitigate both the rain and wind, I loosely covered the greenhouse frame with plastic for the weekend. I harvested basil and moved the banana plant, since they were too tall to fit inside. The banana is now in a large planter in my basement. I blanched the basil and turned it into a quart of pistou (pesto without the pine nuts).

Basil - before becoming pistou

We spent the evening reading, munching on toast with pistou, waiting for the storm to pass. From our digital clocks, it looks like we briefly lost power around 2 am, but that was it. The garden fared well, with just edge flaps of the plastic coming undone. Once things dry up this afternoon, Ill go ahead and remove the plastic again for the rest of the summer.

The Garden - After Irene
Read More..

Aeration And Water Movement

 
These plants thrive right above the air stone!  (LINK)
Could this be caused by the movement of water through the roots or is it increased oxygen?  In any case, whether its due to increased oxygen or water movement it is obvious that air stones in the raft tank are quite beneficial.

I asked Forest, my friend and hydroponic guru, if it might be due to water movement.  He felt strongly that its the improved oxygen in the water rather than water movement.  Im still on the fence about that, but Forest really knows about hydroponics so I tend to believe what he says.

But this has gotten me thinking  about adding an aquarium PowerHead and/or incorporating an Under-Gravel Jet System as described at this link.  The Under Gravel Jet appears to be very similar to a Fluidized Sand Filter.  
I found this article about designing a Fluidized Sand Filter.  
Further research shows that they can be designed to remove Nitrates as well as Ammonia and Nitrites.  This of course is not what we would desire in an aquaponic system, but it appears easy enough to avoid removal of Nitrates by not building the filter too deep.


Devin uses very large 12" air stones in his raft tanks under the gravel.  Yes he places gravel in the bottom of his Floating Raft tanks.   His results are astounding and I tend to agree with Devin about Rafts vs Gravel beds.   Transplants do better when placed into a raft and growth rates seem to be better, and with good aeration the raft systems can only be improved.

I bought a Hydrofarm Active Air Pump.  
Its a bit noisy but an optional volume control can turn adjust the volume and the noise.

* UPDATE October 10, 2012 -  This Hydrofarm pump has been running 24/7 for 4-1/2 months.  It progressively became louder until it sounded like a jack hammer.  Two days ago I turned it off and replaced it with a new EcoPlus Commercial Air 5.   Even after rebuilding it with parts supplied by the distributor it was no longer working properly.    I have high hopes for the new EcoPlus Commercial Air 5.  It runs much cooler than the Hydrofarm pump which ran so hot I could not even touch .
The new EcoPlus Commercial Air 5. is by no means silent, but it purrs with a low tone rather than a raspy and unpleasant noise. 
The noise was too much so I placed the air pump inside my shop and plumbed the line out to the system
Heres a video about how to repair an air pump


Today I placed four fat air stones in this raft tank under about 4 inches of gravel.
 
Its about time to make some better rafts 8-)

Read More..

Making smoked foods Mock bacon

Im not really sure how to make bacon, but I can now smoke stuff, and bacon is smoked pork, so I should be able to get it half right at least.

Hope I dont die!

Actually Ive read a lot of safety info, and it seems I can cold smoke stuff at dangerous, bacteria breeding temperatures for less than four hours, without killing myself.

I think.

Dont try this at home.

Ahgggeh...

Go on.

Youll be fine.

Ahgggeh isnt a word in Australia or anything. Thats just the sound I made.

I type it as I hear it. And I hear it as I say it.

I have no idea what Im talking about.

So...

I brined two completely different looking cuts of pork that both claimed to be pork belly.

I added around a 1/2 cup of sea salt, and a half cup of brown(ish) sugar, to a squirt of honey, and some fresh ground black pepper. I also threw in three bay leaves, and Im pretty sure there was something else as well.

Its late here.

And the people next door have had enough smoke for the day so Im about to retrieve my smoked stuff.

It looks kind of pallid.

But it has an interesting scent, that might be a little promising.

Whatever happens, this will not be the kind of bacon-like substance that you might be able to put in your cellar for a few weeks. This will be the kind of thing Ill be freezing, then making sure I cook it.

A lot.

Before eating.

Which is fine by me, because I think bacon should be crunchy.

I also smoked some jalapeños in there.

Im off to retrieve it all now.

Ill let you know if it kills me.


Read More..

More Bigger and Better

The pipes are buried to keep it neat

Expansion is already planned for
This is a settling tank.  I have stubbed out for future expansion.


Waiting for the Uniseals and the next Bunk feeder to arrive. 

Cherry Tomatoes in abundance!
Bunk feeders are on the other side of this IBC system.
Can you believe it, there are three IBC tanks here?


I really like these bunk feeders.
Ill be using a hard plastic which will stay afloat by means of sealed PVC pipes for my raft.
Its called the GM Raft!
This will allow even more air to circulate around the roots.
Take a look at this link and the idea from Giorgio

Read More..

Cleaning New Gravel and Pipe Size

Cleaning Gravel:

Yesterday I cleaned about 5 cubic feet of new gravel.  In the past I have used progressive tubs and a bucket filled with holes.  I would start at one end and work my way down three or four barrels of progressively cleaner water.  This proved to be insufficient and the barrels became quite dirty very quickly which meant that I would constantly have to start over with more clean water.

But yesterday I used a small cement mixer.  Id put 10 shovel fulls of gravel in and filled it with water.  Then turn the mixer on for 15 seconds, and dump the water.  I did do this about 7 or 8 times until the water was running clear.

This next step may not be necessary, but then I did a final rinse in a white bucket.  I was able to easily see how clean the water was in the white bucket, and two quick rinses generally finished the job.

It took a few hours to perform this cleaning, but after several bad experiences with cloudy water, Im very happy with the results.  Today my water is perfectly clear.  

Pipe Size:

A couple months ago I added 10 feet of 1-1/4" pipe to the line from my fish tank to the grow bed.  It has worked well until recently when I noticed that the water in the fish tank was beginning to raise.  Closer inspection of the pipe revealed that gunk had built up on the surface and was slowing the water down.   I replaced the pipe with a clean 2" pipe.   Ill let you know in a few months how that worked out.   Im feeling confident that this is going to work out much better.    As a general rule Id say 2" or larger pipe should be used everywhere.
Read More..

Sister Simone Campbell Urges us to Engage in Holy Curiousity and Sacred Gossip

"Faith calls us in the Christian tradition to carry Jesus into the marketplace, to ask the questions Jesus would ask now,” Campbell said. “We the people have got to have holy curiosity and sacred gossip so that we create a groundswell of claiming the communal reality that we’re in this together.”

Holy curiosity that makes us ask people those very improper questions like when you’re in a restaurant and you speak to your waiter and you say, are you 8 making more than minimum wage, or do yo u depend upon tips to get by? When you’re in a dress shop or a grocery store, are you all unionized here, do you have good wages? And what I’ve discovered is often, the answer is no. No, they don’t. How do we get justice if our focus is getting the cheapest possible price, or the most possible stuff? How do we do justice in our lives? That’s the holy curiosity we have to ask, where we have to ask the question, is justice happening here? Can we make a difference? But then, the best part, my favorite part is then, we’ve got a right to sacred gossip, sacred gossip where I can tell you, do you know?

“I always joked that the miracle of loaves and fish was sharing. The women always knew this. But in this moment of need and notoriety, I ache, tremble, almost weep at folks so hungry, malnourished, faced with spiritual famine of epic proportions, my heart aches with their need. Apostle - like, I whine. What are we among so many? The consistent 2,000 year - old ever - new response is this ... Blessed and broken, you are enough. I savor the blessed , cower at the broken, and pray to be enough.”

Sister Simone Campbell
excerpts from keynote address to Episcopal City Mission Annual Dinner, June 2015, and comments in ECM Awards Dinner
Read More..

Tanks and Grow Media


If I only knew then what I know now...


I like these troughs I found at Tractor Supply.  They are a bit shallow, but I think they will do very well.
Heres an update to my expansion using bunk feeders.
Im seriously considering this long one (approximately 10"Dx24"Wx108"L) for a grow bed.  $154.00

These would make a nice fish tank.  The big one is about 300 gallons. 5Dx3H  $250.00


After building my own tanks from both 45mil EPDM and the pond liner they sell at Home Depot I would lean toward these heavy duty Rubbermaid Structural Foam Stock Tanks, because they are less likely to leak, easy to clean, easy to insert bulkheads into

I have also built an IBC system.  But polyethylene is not UV proof.  This round tank appeals to me because it would be less difficult to manage than a 4 deep IBC fish tank.   

My relentless quest for a reasonably priced media has finally turned up Pumice.

UPDATE 12/3/2012
Pumice has turned out to be a great media for net pots, but it packs, and I believe it would tend to clog if used in an aquaponic media bed where the purpose of a media bed is to filter the solids.  It might be acceptable in a hydroponic or bioponic system where solids are not an issue.

The pumice I bought looks exactly as in the picture.
The size ranges from about  3-8 mm.
The pieces are very hard and do not easily crush.

I crushed a piece with a pair of pliers.  Then I rubbed it between my hands.  Some particles first appeared to be long and pointed, but the rubbing caused them all to break down into irregular grit.  There were no sharp shards left in my hands afterward, and nothing that looked sharp remained.  It tends to form roundish particles.

Its extremely easy on the hands.  Its soft on the skin and nails; not at all like feather rocks or lava rock.  There are no shape shards, and if it brakes I doubt that it would create sharp shards. When it was dry it felt like placing my hands in puffed rice.
The best description I can think of is like heavy Perlite

After soaking for approximately 20 hours about 2/3 sank and the other 1/3 remained floating.  It was easy to separate the sinkers from the floaters.
After two days 95% had sunk and eventually all of it sank.
I would suggest rinsing well as the water was a bit cloudy.

When I rinsed it, the first water changed from pH from 8 to 6.6, but after several rinses the pH did not change.  
The cost was $28 per 1/2 yard.

I would assume that it is available at many garden nursery suppliers so availability is less of a problem than expanded shale, and yet the price is well below clay medias.

Overall I think it would be a very good media for ebb and flow if some protection were put in place to screen the very small particles.
The material could be separated according to size with a screen, but it packs well enough that it does not fall through the cracks of a net pot like the clay balls, and yet continues to drain well allowing for plenty of air.


Im very impressed by it, and look forward to replacing all of my other medias including Hydroton.  Considering the price it is well worth taking a look at.

  
The pumice worked in a net pot.  Fewer grains fell through the pot than if I had used Hydroton.


Read More..

Duckweed and String Algae


The video above is one of the best for both duckweed and string algae.


String Algae may begin to grow in your system.  Its not all bad because it can be useful as a fish food, but it tends to clog the system.  If your fish dont keep it under control a small amount of salt in the water will kill the string algae.

There are many varieties of duckweed.  I have two, but one or the other will tend to prevail depending on the time of year.  Duckweed can be rinsed and used in salads and it provides good protein for your fish.    Under ideal conditions duckweed will double its volume in just a few days, but you will probably have to raise your duckweed separate from your fish because they will eat it faster than it reproduces.

Duckweed cleans the water, but it can also exclude oxygen if it grows too thick.  It prefers warm water, and seems to grow out of control when the conditions are right.  Creating the right conditions can be difficult, so I spread it around various areas and let it grow where it wants to grow. 


Good article about Duck Weed
http://www.fao.org/Ag/AGAInfo/resources/documents/DW/Dw2.htm
Read More..

Subterranean Heating and Cooling

Installing a Subterranean Heating and Cooling System


Last night CTD commented on my post "If I could design a system from scratch...," saying:

You may have already thought about a subterranean heating and cooling system, but if not, heres a couple of links. Im considering one of these for its year-round efficiency (off grid if I can get the math to work out) and possibly a small rocket mass as a supplement for those really cold stretches...

http://www.youtube.com/view_play_list?p=672EC08E98ABA0FD
http://www.sunnyjohn.com/indexpages/shcs.htm

Such cool stuff! The subterranean heating/cooling system is primarily three layers of Underground Air Circulation Tubing (UACT), 4 inch thin-walled perforated drainage tubes (less than $6 per 10 foot length at Home Depot). The tubes are spaced about every 2 feet horizontally in each layer, and the UACT layers are each a foot deep. The tubes are connected to a plenum (e.g., a 55-gallon drum) at each end, and a fan blows the entire volume of the greenhouse through the underground tubing every 10 minutes.

During days when it gets toasty in the greenhouse, air enters the system warm and moist and comes out cool and dry, leaving the moisture and heat energy in the soil. When the greenhouse air gets colder than the soil (e.g., winter nights), the fan pumps cool air through the ground and it comes out warmer and moister.

John Cruickshank of SunnyJohn.com says hes created greenhouses in Zone 4 (average minimum temperature of -25 degrees F) that maintain a Mediterranean environment all year round without any supplementary heat.

I still want to include a rocket mass heater. One, I like to burn things (wood). Two, I like to cook things (pizza...). Three, my greenhouse isnt a double-glazed marvel of heat retention, so it will probably need supplemental heat, even though Im in Zone 7 (average minimum temperature of 5 degrees F).

Here are some sketches of how I think I could have both a Subterranean Heating and Cooling System (SHCS) and a Rocket Mass Heater (RMH).


Read More..

Photography My new macro bot

I built a thing today.

It moves stuff in small increments using a small electric motor, in response to a users input.

I guess that means Ive built my first robot.

Actually, probably my second.

Anyway...

My device looks like this


It also looks like this.

The bit with the "1" next to it is my previously built power supply that delivers 5 volts to my project.

The bit with a "2" next to it is the previously made PICAXE Proto Board that connects some input/output pins to my breadboard.

The "3" is the transistor bit, that powers the motor when the chip sends a signal to do so.

And the "4" isnt really visible. If you could see the "4", it would be next to the the switch that the user presses to make the subject move a tiny bit.

The point of this exercise is to attempt to make a device that carries an empty box of mints along a steady track, to carry a subject to different focal distances, in order to make a series of photos to create a focus stack, and thus create an image with a greater depth of field than might otherwise be achieved.

This absurdly simple solution, represents my first successful attempt at creating an electronic something without external help from someone, somewhere on the planet.

All the software does is wait for someone to press the button, then move the subject a tiny bit closer to the camera. This changes which bit of the subject is in focus, and enables the user to take a "stack" of pics, each one having a different plane in sharp focus. The user can then knit them all together using some free software, creating a photo with an otherwise impossible depth of depth of field.

The 11 lines of code that makes it work look like this (the very small amount of black text is the actual software, the green text is just my description of it)

--------------------------------------------------


; Macro Mover ver 2013 06 10 0200
        ;moves a small platform holding a photographic macro subject a tiny amount closer to the camera                    each time a button is pressed, helping to create a "focus stack"
;120thingsIn20Years.blogspot.com
;no rights reserved
;use at your own risk

;For picaxe 08M2

#No_Data saves a few seconds when uploading the code to the chip, because it doesnt have to check for data

main: begin the main program loop

if pinC.1 = 1 then gosub Move    if someone is pressing the button, jump to the bit of code called "Move"

goto main if it gets this far, go back to the start and check for a button press again

Move: the bit of code that moves the platform with the subject on it

do until pinc.1 = 0 :loop hang here until the button is released

high 2 turn on the motorconnected to pin 2
pause 2 wait for 2 milliseconds
low 2 turn off the motor connected to pin 2
pause 100 pause for 100 milliseconds

      return go back to the gosub that called the "Move" code

-------------------------------------------------


I started with an old CD ROM drive that I ripped all the interesting bits out of.

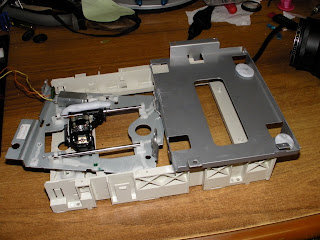
I think this is the original motor because it fits perfectly. This is the motor that made the laser head move from the centre to the rim. Now its the motor that moves the photographic subject towards the lens, changing which bit is in focus.

The blu-tac is there as a weight to keep the linear cog in contact with the gear that the motor connects to.


So the motor makes the black bit move from this extreme...

(see the black bit)


to this extreme, but in tiny increments each time the button is pressed.

Each button press causes a a quarter of a millimetre migration.

.25 mm = 0.0098 inches

A tiny amount each button press.

The camera sits on the large grey platform to the right.


The software controls how much the motor moves at any given moment. This way we control how much we increment the slice of our subject that is in crisp focus.

The camera is securely set in place because there is a tight fit due to my bending some tags in order to hug the camera. There is also two lumps of blu-tac securing the camera to the base.

This arrangement feels totally secure, and I havent had any problems with the camera moving.


Last, but far from least, I added a subject platform  and a light source. The subject sits on a platform made form an empty tic-tac (small mint confectionery) box,

The light source is the thing on three zebra legs.

Its best to move the light source with the subject as it moves toward, or away from the camera, to avoid photos with different exposures, so a light that moves with the subject is best.


Once you have a "stack" of photos with different bits in focus, you can knit them all together with a program like "MacroFusion" (free, open source program I run on my linux computer)

To use this Macro-bot device, you press down once or more times, on a button to move the subject a tiny bit closer to the camera. After each button press (or two or three) you take a photo. Each time you press the button, the subject moves a fraction of a millimetre. I found pressing the button once was suitable for macro shots where the lens was at full zoom, and pressing three times when the lens was at minimum zoom.

Some experimentation is required, but as soon as I made this, I immediately solved all the problems I was having with poor alignment of my photos in a focus stack.

Successful results to follow...


120 Things in 20 years - Sometimes, all you have to do to make a robot, is to replace all the bits from the robot you salvaged last week.


Read More..

Epic adventurer Think steering and kill switches

I built a more sturdy frame to hold the solar panels.

It sits quite low to the back half of the boat.. On my epic adventure, Ill add 4 extension tubes so that I can get under the frame and use the space (and perhaps even sleep under if), but when I just go our for a day trip, Ill leave the tubes off, and keep it low. It needs to be low so it can travel on highways on the trailer without shaking to bits, or catching too much wind. 

Im mounting the entire assembly on hinges so I can lift one side at a time to add the extension tubes before I set off.  

The panels were originally going to be mounted on hinges as well so I could tilt them to the sun as required, but I figured Id keep it simple and see how much cruising time I have per day without moving them. I can always add hinges later.


The frame looks a bit like this...

 (you might recognise it as my old aquaponics growhouse with some bits re-aranged), but I might cut some more bits off to shorten it a little. Its around 200mm longer than the solar panels, so the rest is just excess weight. 


120 Things in 20 years thinks it might actually happen. Some of it already works!
Read More..

Airlifts Geysers and AquaZen

I want to begin by saying I am not an expert with airlift design.  My results  differ from others who have spent more time experimenting with airlift technology.

I like airlifts because they are less expensive to operate and can be built for only a few dollars.   Airlifts aerate the water and are able to pass objects such as way ward fish without clogging.  They have no moving parts; instead they rely on an external air pump which would in most aquaculture systems already be present.

In the video below I experimented with three types the pumps.  A simple Airlift, a Geyser Pump and an AquaZen Airlift.  This video documents the results.

This video shows me running five different airlift configurations.
All of the designs performed very close to each other.
Some factors that may be influencing the differences are the diameter of the pipes and the number of turns.
Each test was performed with a 200 lpm EcoPlus 7 air pump running at 93W.
The vertical pipe was submerged 24-1/2" and the rise was 13-1/2" +/- 1"


Test #1 Simple Airlift with Separator - 5 gal/62 seconds
Test #2 Simple Airlift w/o Separator - 5 gal/58 seconds
Test #3 Geyser with Separator - 5 gal/74 seconds
Test #4 Geyser w/o Separator - 5 gal/50 seconds
Test #5 AquaZen - 5gal/58 seconds

In each case the separator appears to actually reduce the performance. Sorry I did not run the Aquazen test without the separator.  I believe the loss of performance is due to my design and I will try to make this part more efficient.

The Geyser and Simple Airlift performed as well or better than the AquaZen. But there are many factors that may have been overlooked. As far as I know the check valve was installed correctly and there were no significant leaks. The submersion and rise were kept within a 1" tolerance and the barrel was filled to the top each time.

I hope others will take the time to build and test these, and other airlift pumps. More data might help. It may also be that they each operates best at different lifts. I still have so much to learn
Read More..

Water Storage and the BioSand Filter


825 gallon rain water catchment system

I live in the US, in arguably the richest county in the US, per capita (Fairfax, VA).

Even so, there are times when no amount of money can make potable water come out of my tap. System flaws (e.g., water main ruptures), acts of God (e.g., hurricanes), or acts of man (e.g., sabotage) can all mess with the availability and/or quality of my water.

Not cool. Thirst, dysentery, and cholera are nasty things.

Im loving the magnitude of water storage possible with common 55-gallon drums and PVC pipe or hose and hose fittings.

But if I had an infinite supply of water, Id still have to purify it.

I have my solar oven, with a water pasteruization indicator (WAPI), a little vial filled with soy wax. You put it in a container of water with the wax side up - come back after a day in the sun, and if the wax has melted and re-coalesced at the bottom, you know the water was at 200 degrees Fahrenheit for at least 10 minutes and has been pasteurized.

But I think Ive come across something even better: The BioSand Filter. One of these babies can produce 5-15 gallons of clean water in an hour. Here are two videos: a funny one that doesnt really explain the physics/biology of the thing, and an earnest Christian charity one that does a great job of explaining all the details you need to understand:

BioSand Filter - Cute video (light on detail)


BioSand Filter - Earnest Christian video

Wikipedia has a nice article on the BioFilter, and theres a website called BioSandFilter.org that gives details regarding who, how, and what, for those of you who like those kinds of details.

Enjoy!

Read More..