Showing posts with label new. Show all posts

Aquaponics Tomato

Its cold and rainy here in South Australia, and I keep picking tomatoes.

Winter isnt a good time for tomatoes, but mine seem to be having fun anyway.

My four tomato plants that are growing so their roots are suspended in the fishtank water seem to be fruiting a lot later in the season than they should be. The plants are out in the cold, but their roots are inside the fishtank which is inside a little growhouse.

The plants look like this.


And they are still doing a lot of flowering.


And there are plenty of fruit all over the vines.


And the fruit are still ripening.

These were todays pickings.

Not many today, but there are always some. And a few didnt make it inside.

And there are a lot more on the vines that are nearly ripe. Ripe enough to eat.


All these pics were taken today. Its winter in the southern hemisphere, so the tomatoes should have stopped fruiting a while ago.

Its strange that they are still growing and fruiting this late. Strange enough that I thought Id contact someone from one of our universities. I remember someone from my research into bees, who was working on growing native bees to pollinate tomatoes. Im not sure if there were a bee person or a tomato person, but I emailed them in the hope that if they dont care, they might know someone who does.

It might save the industry a bit of money if it turned out the entire plant didnt need to be kept warm to keep them fruiting.


120 Things in 20 years says to be on the lookout for tiny hot houses with tomatoes growing out of PVC tubes, coming to a winter tomato farm near you. Or not.
Read More..

Photography New to me Canon EOS 20D camera

My new camera is a lot like my old camera in so far as they both take pictures, and they are both 8 megapixel cameras.

But after that they diverge a bit.

The Sanyo Xacti that Ive been using for the last 1300 photos Ive taken was gifted at me by someone (Thanks anonymous company) when I really needed a replacement because all the point and shoot digital cameras Ive bought to make this blog (I think its 3 now) fall over just after 5000 happy snaps.

5000 seems like a lot when I put it in print, but in terms of time, that equates to less than a year per camera.  Sure they cost less than AU$100, but I still want more than a year out of anything I buy.

This one that Ive been using is still going strong, and does a pretty good job of it I suppose, but I found the interface very heavy going.

It has quite a few options and features, but all of them have to be accessed via a clunky multi-level menu system. That means that every time you want to do anything other than what its set to do now, you have to explore a stack of menus to finally find what you need, and by the time youve found it, the ladybird has finished eating its aphid, and flown away.

My new camera on the other hand is a zillion times better to work with. Ive only had it for around 10 hours, but it already feels comfortable.

Its taken around 1200 pictures so far in its life.

I have very greasy fingers.

Im eating zucchini and haloumi fritters.

Delicious.


The new camera is a Canon 20D. It was originally sold for around AU$1500 (Australian dollar) in 2004, and was described as a "semi-professional" or "prosumer" camera at the time, which of course means substantially more than other imaginary words and their associated imaginary metrics.

But on the whole, the camera rocks.

Thats my official rating out of 5.

It has a 4 GB CF memory card, which is the size of a bulky circa 2012 64GB mp3 player, and that cost around the same as a bulky circa 2012 64GB mp3 player. It takes a while to transfer photos, but it has very nice functionality, and best of all has an interface that works.

It also comes with some nice lumps of glass in the lens. It seems to be the lens that lets down lots of little point and shoot cameras. The quality of the photos taken by my new 8 megapixel camera is a lot better than those Ive taken with an 8 megapixel point and shoot style camera.

The second lens feels a bit like it might blow away, but at $10 its a very nice thing to have around.

The camera came with a Canon 18-55mm f3.5 image lens, with image stabalizer. Ive just discovered I love image stabalizing. Image stabalizing allows you to be a bit shakey, and have the lens do some stuff to fix it.

As I understand it, there are exactly two ways to do image stabilizing.

  • 1. Project an image onto the censor, so that the image is a little larger than the censor, and the image has some extra image in the margins. Then have the camera track your shakey projection, and then use magic or software or something to knit together a nice crisp image.
  • 2. Track some points on the image, and move the lens around a bit so that any given point on the censor always sees the same bit of the image, or move the censor to achieve the same thing.
  • 3. Use gyroscopes mounted on at least two axes to resist the movement of the entire camera. Things spinning around like to keep doing it. If you take the tire off your bike (stop first) and hold the axle while someone else spins it as fast as they can, it becomes difficult to change the angle its on. This is why a spinning top (do they still have those?) stays upright, and is simply due to the universe being an amazing place.
Amazing!

The camera shows its age through its 8 megapixelness, as at the time of writing, thats about 16 megapixels short of where it should be.

I bought it from a second hand camera store in Japan for $150 with the Canon 18-55mm zoom, and I got the second lens, a Tamron 100-300 zoom, for $10 from the bargain bin.

Thanks Tom.

Toms a friend of mine.

Hes really good at buying way too much camera gear from junk bins. His hobby includes buying those instamatic film cameras that were big in the 70s. He likes to buy them when they have rolls of film still in them so he can process the film. In some subtle way, thats slightly different from buying some old photos.

Which is nice.

For him.

Hes kind of a time traveller, but he only gets to look, and doesnt get to choose what he looks at.

Mostly he gets to look at darkness.

Sometimes darkness, but with slightly mouldy edges.

Luckily, I dont suffer from collecting things other than my collection of odd people I know.

Toms one of my favourites.

Thanks Tom.


120 Things in 20 years - One of the best parts about getting my new, second hand Canon 20D camera, was getting to look at the Japanese supermarket junkmail it was packed in. Its been 20 years since I was in Japan, and the junkmail paper is now of even better quality.


Read More..

Electronics New fish lever switch

I was wandering around wondering in an electronics store today, and found a new, even better switch  for my fish activated lever on my demand fish feeder.

It looks like this.

The one on the left is what Im using now, and I had to glue some tubing on it so that it looked more like the one on the right.

The one on the right already looks absurd without my having to glue anything to it at all.

I have no idea why someone would need an inch long press button switch.

Unless they were using it as a fish lever.


I mentioned to the owner that the switches could be triggered with sideways pressure.

He didnt know that.

It seems the manufacturer didnt intend it, and it is just a pleasantly useful side affect of the manufacturing process. .


120 Things in 20 years - Getting ever close to filling up my brain with new facts about electronics and absurdly long new fish lever switches for my aquaponics demand feeder.

Read More..

Aquaponics Direct composter duckweed drying

My system has only one fish, and Im getting a little worried about my growbeds worm population. Im not confident theres enough fish waste going into the system to feed them all.

What I thought I might try is creating a small compost bin directly in my growbed to make sure the worms have enough to eat.

I have a lot of duckweed growing in my system, and that one fish has to power the new bigger growbed, and the duckweed.

Duckweed uses quite a bit of useful nutrient so I thought I should remove some, and add it back into the system via the composter.

 I pulled out a quarter of a bucket or so of my duckweed from the system, and dumped it on some dry, sheltered concrete to dry.


I need to dry it first to kill it, because the direct composter will be a small container full of holes, sitting directly in my growbed. That means it will be damp, and the duckweed might just stay alive.

As I understand it, worms feed on the stuff that feeds on rotting vegetation so live duckweed wouldnt work so well.


120 Things in 20 years seems to be growing plants for feed to grow other plants. I think I finally developed a way to make growing vegetables as inefficient as growing beef.
Read More..

Aquaponics New system at two months

In a couple of days my new system will be two months old.

I wasnt sure how it would go being on the wrong side of the house and in shade for all but a couple of hours a day, but it looks like it might be ok.

This is the original empty growbed two months ago.


And now it looks like this.

The lettuce in the foreground went in as store bought seedlings, and the rest was from seed, but I wasted a lot of time before I actually sowed them.

We have started harvesting leaves from the lettuce and within a week or two we should be picking rocket as well.


The growbed is around two metres long and a little over a metre wide, so it should keep us in salad greens with ease.

Ive also planted a few sugar snap peas at the back because I like to eat them when Im doing anything with the garden. Theres not enough to harvest but I enjoy picking something and eating it at the growbed.

Also at the back Ive planted quite a bit of basil, some coriander (cilantro), and a few other herbs.

Thats all. Just a quick update.


Read More..

Cleaning New Gravel and Pipe Size

Cleaning Gravel:

Yesterday I cleaned about 5 cubic feet of new gravel.  In the past I have used progressive tubs and a bucket filled with holes.  I would start at one end and work my way down three or four barrels of progressively cleaner water.  This proved to be insufficient and the barrels became quite dirty very quickly which meant that I would constantly have to start over with more clean water.

But yesterday I used a small cement mixer.  Id put 10 shovel fulls of gravel in and filled it with water.  Then turn the mixer on for 15 seconds, and dump the water.  I did do this about 7 or 8 times until the water was running clear.

This next step may not be necessary, but then I did a final rinse in a white bucket.  I was able to easily see how clean the water was in the white bucket, and two quick rinses generally finished the job.

It took a few hours to perform this cleaning, but after several bad experiences with cloudy water, Im very happy with the results.  Today my water is perfectly clear.  

Pipe Size:

A couple months ago I added 10 feet of 1-1/4" pipe to the line from my fish tank to the grow bed.  It has worked well until recently when I noticed that the water in the fish tank was beginning to raise.  Closer inspection of the pipe revealed that gunk had built up on the surface and was slowing the water down.   I replaced the pipe with a clean 2" pipe.   Ill let you know in a few months how that worked out.   Im feeling confident that this is going to work out much better.    As a general rule Id say 2" or larger pipe should be used everywhere.
Read More..

Aquaponics Shell grit seed raising

It seems like Ive been trying for ages to find a decent method to raise seedlings from seeds.

My preferred method would be to just throw them all over the place and see what happens, but I suspect the clay ball media allows seeds to fall way down into it. Its possible that with the normal vibrations of city life, that the seeds fall all the way down into the water and then sink to the bottom and rot.

One problem with raising seeds in potting mix is that you do a lot of damage to the roots when you wash them before transplanting them into the aquaponics system.

I add shell grit to the system as a pH adjuster. The nitrifying bacteria tend to move the system toward the acid side, and the shell grit brings the pH back into line (approx pH 7.0).

So I figured it might be a good idea to raise my seedlings in shellgrit.

I started with a food container, and drilled a few holes around the base.


Then added the mesh from a stainless steel sieve, and filled it with shell grit.

Shell grit can be bought where ever you might buy chicken feed, as they sell it to people who have chickens. Chickens eat it and it helps make their eggshells strong.


I chose a space close to the water inlet in the growbed to bury it so the water flowing through would have high levels of dissolved oxygen. I figured this might be important as the flow through the tightly packed shell grit would be slow.

I buried it at a depth so the water level just reached the shell grit. The water "wicks" up through the shell grit so it stays moist.


I also added a lid in the form of another food container.


Im not sure if the lid is needed, but a lot of store bought seed raising trays have lids so I thought Id add one. It probably isnt required because Id guess the lids are used to keep the moisture in, but with water always wicking up from the bottom...

Who knows.

I have no idea if this will work, but as always, Ill let you know one way or the other.


120 Things in 20 years - My ribs hurt.
Read More..

Photography My new macro bot

I built a thing today.

It moves stuff in small increments using a small electric motor, in response to a users input.

I guess that means Ive built my first robot.

Actually, probably my second.

Anyway...

My device looks like this


It also looks like this.

The bit with the "1" next to it is my previously built power supply that delivers 5 volts to my project.

The bit with a "2" next to it is the previously made PICAXE Proto Board that connects some input/output pins to my breadboard.

The "3" is the transistor bit, that powers the motor when the chip sends a signal to do so.

And the "4" isnt really visible. If you could see the "4", it would be next to the the switch that the user presses to make the subject move a tiny bit.

The point of this exercise is to attempt to make a device that carries an empty box of mints along a steady track, to carry a subject to different focal distances, in order to make a series of photos to create a focus stack, and thus create an image with a greater depth of field than might otherwise be achieved.

This absurdly simple solution, represents my first successful attempt at creating an electronic something without external help from someone, somewhere on the planet.

All the software does is wait for someone to press the button, then move the subject a tiny bit closer to the camera. This changes which bit of the subject is in focus, and enables the user to take a "stack" of pics, each one having a different plane in sharp focus. The user can then knit them all together using some free software, creating a photo with an otherwise impossible depth of depth of field.

The 11 lines of code that makes it work look like this (the very small amount of black text is the actual software, the green text is just my description of it)

--------------------------------------------------


; Macro Mover ver 2013 06 10 0200
        ;moves a small platform holding a photographic macro subject a tiny amount closer to the camera                    each time a button is pressed, helping to create a "focus stack"
;120thingsIn20Years.blogspot.com
;no rights reserved
;use at your own risk

;For picaxe 08M2

#No_Data saves a few seconds when uploading the code to the chip, because it doesnt have to check for data

main: begin the main program loop

if pinC.1 = 1 then gosub Move    if someone is pressing the button, jump to the bit of code called "Move"

goto main if it gets this far, go back to the start and check for a button press again

Move: the bit of code that moves the platform with the subject on it

do until pinc.1 = 0 :loop hang here until the button is released

high 2 turn on the motorconnected to pin 2
pause 2 wait for 2 milliseconds
low 2 turn off the motor connected to pin 2
pause 100 pause for 100 milliseconds

      return go back to the gosub that called the "Move" code

-------------------------------------------------


I started with an old CD ROM drive that I ripped all the interesting bits out of.

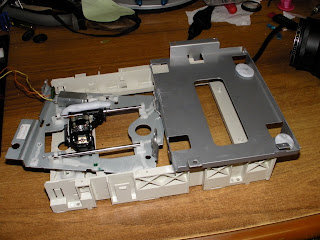
I think this is the original motor because it fits perfectly. This is the motor that made the laser head move from the centre to the rim. Now its the motor that moves the photographic subject towards the lens, changing which bit is in focus.

The blu-tac is there as a weight to keep the linear cog in contact with the gear that the motor connects to.


So the motor makes the black bit move from this extreme...

(see the black bit)


to this extreme, but in tiny increments each time the button is pressed.

Each button press causes a a quarter of a millimetre migration.

.25 mm = 0.0098 inches

A tiny amount each button press.

The camera sits on the large grey platform to the right.


The software controls how much the motor moves at any given moment. This way we control how much we increment the slice of our subject that is in crisp focus.

The camera is securely set in place because there is a tight fit due to my bending some tags in order to hug the camera. There is also two lumps of blu-tac securing the camera to the base.

This arrangement feels totally secure, and I havent had any problems with the camera moving.


Last, but far from least, I added a subject platform  and a light source. The subject sits on a platform made form an empty tic-tac (small mint confectionery) box,

The light source is the thing on three zebra legs.

Its best to move the light source with the subject as it moves toward, or away from the camera, to avoid photos with different exposures, so a light that moves with the subject is best.


Once you have a "stack" of photos with different bits in focus, you can knit them all together with a program like "MacroFusion" (free, open source program I run on my linux computer)

To use this Macro-bot device, you press down once or more times, on a button to move the subject a tiny bit closer to the camera. After each button press (or two or three) you take a photo. Each time you press the button, the subject moves a fraction of a millimetre. I found pressing the button once was suitable for macro shots where the lens was at full zoom, and pressing three times when the lens was at minimum zoom.

Some experimentation is required, but as soon as I made this, I immediately solved all the problems I was having with poor alignment of my photos in a focus stack.

Successful results to follow...


120 Things in 20 years - Sometimes, all you have to do to make a robot, is to replace all the bits from the robot you salvaged last week.


Read More..

Aquaponics New growbed

I have a shiny new allotment of auqaponics real estate!

Yay me!

With a huge amount of help from Mrs. 120 Things, we added two submerged sections of 90mm PVC as inlet and outlet drainage media screens.

We also cut holes in the top of one end of the BYAP grow bend to allow water in from the fishtank, and the bottom of the other end to allow a standpipe to be fitted.

Then we fitted the standpipe. Basically a short length of pipe that sets the depth the water will sit at, by draining the growbed from the top of the pipe, out through a hole in the growbed.

Or in normalspeak, a plug with a tube stuck in it.

The result of a lot of picking through the media (clay balls) to remove all the rubbish that comes with buying second hand media, was this very nice looking growbed. (the growbed was second hand as well)


Working with a purpose built growbed with purpose built media is soooo much nicer than working with home made stuff. Im all for tinkering and DIY, but if you just want a garden, this pre-made stuff is great. I have no connection with Backyard Aquaponics other than existing on their forum* (as BullwinkleII), but having bought one of their growbeds (second hand), I feel very comfortable recommending them.

Getting there.


* and winning my pump and some other stuff in one of their photo competitions.
Read More..

End Hunger in New Mexico Summit Around the Corner

The Second Annual End Hunger in New Mexico summit is only a little more than a month away (September 23-24).  If you havent registered, here is the link. The registration fee is $20, and participants are encouraged to bring non-perishable food items to donate to Desert Harvest, which will distributed it to 17 organizations in need of food.

The summit features many interesting workshops, including  Faith In Action: An Introduction to the Interfaith Hunger Coalition, led by Ellen Buelow, a member of the steering committee of the IHC.

Here is a description. "Our interactive workshop introduces participants to the vision and activities of the Interfaith Hunger Coalition focused in three areas; education, advocacy and direct action. Here’s an opportunity for faith communities to collaborate in a common place. Explore how you and your organization can join forces without duplication of services."

Some of our friends and collaborators are also leading thought-provoking and informational workshops, including SNAP and Work Supports (Louise Pocock, New Mexico Center on Law and Poverty); How Our Food System is Harming Hungry People (Alicia Edwards, Volunteer Center of Grant County); Child Nutrition and WIC Reauthorization: Strengthening the Safety Net (Patty Keane, MS, RD, Nutrition Scientist, UNM Prevention Research Center/New Mexico); Community Bulk Buying Program (Janet Page-Reeves, Research Assistant Professor, University of New Mexico); Food Insecurity’s Impact on Education (Patrick Scott and Jeff Berg, APS Title I Homeless Project, Homeless Liaison staff, and Sandra Kemp, Executive Director, APS Food & Nutrition Services); and Reaching Food Neutrality in your Community by Increasing Capacity (Sherry Hooper, Executive Director of the Food Depot, and Julie Anderson, Food Rescue Manager at Roadrunner Food Bank)     See full list of workshops.

Nancy Pope, another member of the steering committee of the Interfaith Hunger Coalition, will be one of the keynote speakers during the luncheon on Wednesday. Sherry Hooper, executive director of The Food Depot in Santa Fe, and Archbishop John Wester of the Roman Catholic Archdiocese of Santa Fe, will also present remarks at the luncheon.

For more information about the summit, visit the official site.

And here are some tidbits of information in the most recent poster promoting the summit:

DID YOU KNOW?
  • NM has the 2nd worst rates of poverty in the country - 1 in 5 people live below the poverty level
  • NM has the worst child hunger in the nation - 1 in 3 children do not have enough to eat
  • NM seniors are 2nd in the nation regarding food insecurity - last year over 30,000 seniors relied on food banks
  • Every day 40,000 New Mexicans seek food assistance - 40% are children
  • 67,795,200 - the number of additional meals needed every year to end hunger in NM
Read More..

Epic adventurer New solar panels

Bullwinkle III is about to be born.

Bullwinkle was the first incarnation of my little boat. It was originally a SunDance 4.3m one man racing catamaran.

I went halves in it with a friend.

It was old and slow but built solidly.

We broke it.

We fixed it up, but it wasnt strong enough to put it under the kind of strain that a boat sees when its under sail, so the sail had to go.

I put a 1.8m square of marine grade plywood on it and turned it into a fishing barge. I added a large deep cycle battery and an electric trolling motor. This gave me a range of around 6km which is surprisingly enough to catch lots of fish and more importantly, lots of blue swimmer crabs. This incarnation was Bullwinkle II. With the aid of some rope, and some plastic hand reels as pulleys, two empty milk crates as seats, and a pram wheel as a steering wheel, it was quite comfortable. the only downside was that people kept boating up to us to see if we needed help because we looked like a sinking dingy. A sinking dingy with two people standing on it fishing.

Then came Bullwinkle II.V which was essentially the same as Bullwinkle II but it also had a 3hp two stroke motor, but that was just annoying.

So today I spent the money Ive received from you nice people clicking my blogs ads on two new 180w solar panels. They have apparently been built, and are now being put on a ship in China.

Thanks clickers.

Thanks China.

Thanks boats.

So now I can finally build Bullwinkle III.

I have the hulls, the decking, a motor, the frame of my 1.8m grow house (the one that let the sun dissolve its cover), and an office chair.

That should be plenty enough junk to solar boat the length of the mighty River Murray.


120 Things in 20 years just remembered that I hadnt ever gone camping alone, so the night before last I drove to the river with my swag, and tried it. Nothing bad happened.
Read More..

Winner The first 120 things in 20 years competition

So a while ago, I bought a MPPT solar charge controller.

It turns out the nice ebay based company I bought it from was a fraud, and sold me a product that wouldnt work with my solar panel in spite of my having asked them and then double checking. My solar panel had too high a voltage, but the listing said it would be fine.

Anyway...

The result was that I was sent a product that didnt work as advertised.

Eventually ebay made them give me my money back. The company insisted I return their product at my expense.

I posted it to their registered address, but the post office in China said there was nobody by that name at that address.

So China Post returned it to sender.

Me.

All this is old news to anyone who follows this blog, but this is the new bit.

I thought Id give it away because its of no use to me, and might be exactly what someone else wanted. But who to give it to?

I thought Id hold a competition, and give it to the winner, but I cant think of a decent theme.

The current plan for the first ever 120 things in 20 years competition is to run it through the invention engine and see what it thinks.

so... stay tuned I guess. Its late, and Im going to bed.

Tomorrow, the competition begins!


Read More..

Thinking Beam me up Scotty

Dear The-President,

Im reasonably sure that the pressure difference between the Enterprise and (statistically speaking), pretty much every planets surface, would result in a lot of sinus pain and some scenes involving explosive snot.

I feel these scenes were conspicuously absent in the filming of the Star Trek franchise during beaming exercises.

I further feel that in the interest of reality, this should be easily rectified.

The absence of snot is the absence of reality...

Boomshanka.


120 Things in 20 years - Its possible that I have a cold.


Read More..

My new avitar

My new avitar on  community.theaquaponicsource.com  seems appropriate.  
 
Maybe my seeds will begin to sprout better now 
Njörðr is associated with sea, seafaring, wind, fishing, wealth, and crop fertility.


Read More..

Aquaponics New growbed flow control

I few days ago I created and installed all the required bits to control the way water enters and exits my growbed.

All this is probably overkill as a lot of people get away with just dumping water at one end, and draining from the other, but theres a fair chance that at some stage down the track I might try to make this system ultra low energy, so I thought Id design it so the water can move very freely through the browbed, and so it doesnt leave any areas that dont get enough flow. If I go low energy, that might mean low flow, so I designed it to what I think is the best way I could.

The plan is to have the water enter into a submerged pipe at one end of the bed that has a lot of holes in it, and exit via a similar, submerged pipe at the other end. This way the water will enter and exit evenly throughout the width of the growbed ensuring that no corners are left to go stagnant. With high flow, this wouldnt normally be a concern, but I wanted to make sure I had lots of options for the future.

After a bit of experimentation I discovered the quickest and easiest way to make holes in PVC pipe for water flow was with an angle grinder.


Just a normal metal cutting blade does a pretty clean job of cutting a lot of slots in a 90mm PVC pipe.

Just tap it onto the PVC quickly and it works a treat. A one second cut is perfect. Three seconds will burn it.


Slots are a must when using the clay balls for media as if you drilled holes, the balls would block them all.

All sized balls will block all sized holes regardless.

Go with slots.

The end result looks like this and only takes around 5 minutes per meter at most.

I cleaned it up with a little sand paper and added end caps and an elbow.


I cut a hole with a hole saw so that I could add a stand pipe that would go through the elbow, then continue on through the growbed.

Theres no great need to make these joins exact because you want water to seep in all through this bit of kit.


I  found some fittings that for some reason have a tapered thread.

When I got them home, I found that the things they screw into dont, which is kind of strange.


The original idea was to cut a hole through the growbed, and screw the two pieces together from either side to lock the fittings on tight.

Because of the taper, I ended up just making the hole in the growbed really tight, and screwing the fitting in really hard so it cut its own thread into the growbed.

It seems solid enough.

This is what the finished drain looks like. This will drain water from the growbed back to the sump.

A pipe will be fit into the recess at the bottom, so that even though the water enters the drain from the bottom of the growbed, the water will exit the device at a bit lower than the top of the growbed.


I cut a hole with my hole saw into the bottom of the growbed.

This is an oddly scary thing to do.

Shiny new water tight containers dont lend themselves to be holed without causing some distress to the new owner.


I cut the hole slightly smaller than it needed to be, and then hand filed the rest so I could be sure of a very tight fit for the threaded component.


Once coaxed through the hole in the growbed, the standpipe was cut to size, and pressed into place without any glue.

Theres no need to glue it because if it leaks, water wont actually leave the system, and there might come a day when I want to adjust the level, or change the system from constant flood to an auto siphon or something.


The drain assembly looked like this when fitted.

The standpipe runs through the growbed on the left hand side.


The other end was completed in a similar manner, but this time with a central inlet because there was already a hole in that position.


This is where water will enter the system from the fishtank.


And thats it.

The growbed part of the system is complete.

Its worth adding plastic caps top the top of the inlet and outlet media guards to keep the clay balls from getting in when your digging around in the garden.


Like I said, its probably overkill to make the inlet and outlet pipes like I did here, but it should make it just that little bit more efficient.


120 Things In 20 Years isnt above pretending to make a new growbed when really I made it more than a week ago.
Read More..

Thinking Local knowledge


When I was in Papua New Guinea - Madang in particular (I think) Mum found some locals that were willing to let us borrow their canoe for a dollar or two per day. I was quite young at the time, and remember being scared when I could see the bottom, but completely relaxed when I couldnt.

That has baffled me for many years until I experienced a recent fishing trip near Port Pirie (South Australia). The clear waters brought on a vivid memory of the Medang canoe trips. The problem I was having was a fear of heights.The water was so clear, that I felt I was going to fall the thirty feet to the bottom.

Not such a strong sensation when witnessed as a grownup, but as a little kid, it was enough to scare.

The point of this is to introduce a story that will be wrapped up much more quickly than he introduction.

I nabbed a cowrie as a result of spending every day I could snorkelling. (sorry nature). It was a real treasure to me, and I was desperate to take it home to South Australia. It was only a few days before our departure date, and I had no idea how to get the now dead snail out of its home in time for a trip through customs.

A local kid offered a solution.

Juts let it sit next to an ants nest for a bit.

It worked a treat.

The moral...

Have a problem that needs solving?

Ask a kid.


Read More..

New Scuds Filters and Flirting Fish

I got some Gammarus Scuds a few days ago and made this make shift aquarium for them.  Ive also included a look at some new bio filters I just built and two fish that are getting ready to mate.

Scuds AKA Gammarus or Caledonian shrimp are small freshwater shrimp amphipods that can grow to about the size of a grain of rice.

Scuds are an excellent source of live food in aquariums and will rapidly colonize the gravel, keeping it clean by eating uneaten food as well as fish wastes. They are omnivorous and will eat almost anything. Scuds also colonize the filter pads and keep them clean while breeding in them, this makes the filters last well over twice as long.

They are  extremely resistant to changes in environment. Outdoors they can survive Minnesota winters as long as they have unfrozen water beneath the ice, and indoors have no problems with my 86* F crayfish aquariums.

They are super fast breeders and will rapidly colonize,  When scuds mate the male carries the female on his back as they are swimming. The female carries about 50 fertilized eggs in her egg pouch and these are orange in color and show through her semi-transparent body. The young shrimp hatch within the egg pouch and emerge as fully developed young shrimp but MICROSCOPIC in size.
Read More..

Aquaponics Over Flow

I wandered out to my system last night, and had what is commonly known as an HSM.

It must stand for Holy Ship Moment.

One of my grow beds was flooded, and there didnt seem to be any reason why.

This is the scene a few minutes after the pump was switched off.

There was water on the floor, and the pump was sucking in small air bubble through the little tornado that had formed in the shallow water over the pump inlet.


I couldnt figure out what was going on, so did a search of the system.

I found this blockage in the stand pipe.


It was stuck really well, but eventually to hammer it out with a length of dowel and a hammer.

The culprit, shown here, was a small piece of scoria.

This growbeds media is scoria.

I also found bird droppings. Im guessing a blackbird was in there throwing things around and looking for worms.


I do actually have an over flow pipe, added when I first built the little system, but the input flow from my bigger pump is much greater these days, so the little pipe wasnt up to the task.

Even so, its a good thing it was there because I think it saved the day by delaying the disaster until I discovered it.

Ill upgrade the pipe to cope with the new greater flow, and Ive put a PVC cap over the media guard so that particular issue cant happen again.


120 Things in 20 years think the last thing an aquaponics system needs is excitement when it comes to overflows.

Read More..

Stirling Engines My second attempt


I think I may have actually built something.

Or nearly built something.

It looks like this and almost works.

Most of that junk in the picture isnt part of it. The bits that are part of it are the bits that look like a Stirling engine.

Sometimes Stirling engines look like tin cans, and wire, and pink balloons. They also look like cardboard disks with blu-tac stuck weights all over the place to act as a flywheel.


I planned on posting a video of it working today, but it doesnt.

What it does do is spin around freely for a few seconds when you spin the flywheel. It also has a displacer and power piston that are configured in such a way as to do what they are meant to.

I think.

When I put it on the stove top, it nearly feels a bit like its trying to work, then smoke starts pouring out of the seals, so I take it off the heat before it catches fire.

Who knew tape might burn.

Yes. Thats right. I thought Id make my engine using gaffer tape for the seals.

It doesnt work so well.

Tomorrow, Ill buy some glue. I seem to remember hearing of someone who used two part epoxy on a real engine crankcase, so it should cope with the heat.

Maybe.

My next choice will be solder. Solder melts when you get it hot, so Im guessing that wont work so well either.

But the glue might.

If it works, Ill put up a big build post. If it doesnt Ill try something different.


120 Things in 20 years - Using a random evolutionary approach to building a Stirling engine. Chuck some bits in a bag, shake, then cull anything that doesnt work like a Stirling engine. Ill get there eventually.


[edit from the future - For anyone concerned that time may not be linear any more, this post was actually written two days ago, but for some reason didnt get posted. As a result the post after this one was actually two days after this one.]


Read More..