Showing posts with label macro. Show all posts

Aquaponics Tomato

Its cold and rainy here in South Australia, and I keep picking tomatoes.

Winter isnt a good time for tomatoes, but mine seem to be having fun anyway.

My four tomato plants that are growing so their roots are suspended in the fishtank water seem to be fruiting a lot later in the season than they should be. The plants are out in the cold, but their roots are inside the fishtank which is inside a little growhouse.

The plants look like this.


And they are still doing a lot of flowering.


And there are plenty of fruit all over the vines.


And the fruit are still ripening.

These were todays pickings.

Not many today, but there are always some. And a few didnt make it inside.

And there are a lot more on the vines that are nearly ripe. Ripe enough to eat.


All these pics were taken today. Its winter in the southern hemisphere, so the tomatoes should have stopped fruiting a while ago.

Its strange that they are still growing and fruiting this late. Strange enough that I thought Id contact someone from one of our universities. I remember someone from my research into bees, who was working on growing native bees to pollinate tomatoes. Im not sure if there were a bee person or a tomato person, but I emailed them in the hope that if they dont care, they might know someone who does.

It might save the industry a bit of money if it turned out the entire plant didnt need to be kept warm to keep them fruiting.


120 Things in 20 years says to be on the lookout for tiny hot houses with tomatoes growing out of PVC tubes, coming to a winter tomato farm near you. Or not.
Read More..

Photography Hack a macro lens from a zoom lens

I decided to make a more permanent macro lens.

The improvised one here was just too crazy to use. Everything had to be held together with tape, string, and luck.

It turns out its pretty easy to hack a macro lens, if you already have a short zoom lens you dont need.

There are a lot of canon kit lenses that came with the cameras floating around out there for only a few dollars. The best price I saw was $3.98 US.

The lens Im using is a canon EF 35-80mm zoom. I got it for free from someone who paid around $5 for it in Japan.

 The first step is to find some screws that might let you get inside.

The object here is to remove the front lens element.

My screws were found under a sticker, but different lenses hide the screws in different places.


Removing the sticker revealed 3 screws.

The sticker is useless after you remove it, so dont try this unless you want the change to be permanent.

Thats the wrinkled corpse of the sticker in the background.


Undo the screws.


This allows the top lens element to be removed.

This lens cluster does the focusing as far as I can tell.

At this point you can take a macro shot, but the lens will leak a lot of light onto your censor. The black plastic surround covers a gap between the outer lens casing, and the inner sleeve that controls the zoom.


In my lens, it wasnt possible to remove the lens from the plastic surround, so I had to cut it off.

If you were trying to do this as a temporary thing, and wanted to try it before you commit, all you need to do is cover the lens front with something light proof with a hole around 2cm in diameter in the centre.

Im guessing gaffer tape would work well.


The main thing is to create a cover for the gap between the outer casing and the inner zoom sleeve.

The lenses are of no use, but the plastic surround is very useful, because it has a screw thread to take filters.

A clear glass filter, or a UV filter will be the thing that keeps dust out of the lens.

The large black plastic thing is the bit we are keeping.


There was an extra hole that I filled with a screw to keep everything light tight.


A clear glass filter, and its all done.


The results are pleasantly surprising. The original lens could zoom into around 6cm in width. This is closer to 1cm.

The focus ring no longer does anything, but the zoom still zooms. 

There are two ways to focus. 

Moving the camera or the subject until the scene is in focus is where you start. The distance from the lens that the subject needs to be is only around 5cm. Once you have the subject roughly in place, you can use the zoom to change the point thats in sharp focus. 

The zoom also works as a zoom, and changes the field of view between 12mm and 25mm from one extreme to the other. ie at full zoom (as per the shot of the pencil, you can fill the frame with a 12mm object)

All in all, not quite as functional as a proper zoom lens, but for $5 it represents a pretty good compromise, and something Id call a total success.


120 Things in 20 years - If canon just made the front lens element removable, I wouldnt have needed to do this lens hack to convert a zoom lens to a macro. 

Read More..

Stirling engines Balloon Power pistons

My original balloon power piston looked like this.

It had a connecting rod glued to the centre, and the other end of that rod connected to the cam shaft. The result was that as the air was heated in the chamber with the displacer, it expanded, filled this balloon, and pushed up the connecting rod.


I think it also pulls as the air cools and contracts, but that isnt very obvious either way. In that video (see link in first sentence) you can see the balloon inflating and giving the connecting rod a little push.

Im amazed that the air can expand and contract at such a high frequency. Im amazed these things work at all.

My power piston design was a little rough, and to be honest I was lucky that it worked at all.

The balloon kept slipping around under its rubber bands, making the connecting rod feel some resistance as the balloon reached its limits of free movement. The result was some extra friction where it wasnt necessary.

What I need is a bit more room for error.

With that in mind, I did some research and found what I think might be a useful design, and also came up with one myself that might work pretty well.

I found this one in use already and mine was made from a balloon neck, and a plastic bottle top.

To start with I created a plastic disk around 25mm in diameter by trimming off the sides of a plastic bottle cap. 

It was pretty easy to do with scissors, and a cut that went in a spiral gradually cutting away the side.


I also have a copper elbow that will be the power pistons basic form.

This will take the place of the ungainly plastic bottle with the hole hacked into the side as seen in the top-most picture on this post.
I cut the neck off a balloon and inserted the plastic disk. The connecting rod would be glued to the centre of this disk at the top.

The cut end of the neck is stretched over the copper elbow so that it looks like this when at its highest. (this would be the end of the power stroke)


And like this at its lowest.

It looks quite neat, and this is probably the design Ill use unless it proves to require too much air expansion to fill it.


My design includes the same section of balloon neck, and a cable tie to secure the top.

I tightened the cable tie with pliers  and then cut the rest of the balloon away with scissors.


It looks like this at its lowest. Or near its lowest.

It might be the case that this design will prove useful when used entirely at the low end. It requires much lass change in air volume to move 10mm up or down from its pictured position.


I have no idea if it will be of any benefit to use this (green) design, but It should be easy enough to try both with my adjustable cam shaft.


120 Things in 20 years - When it comes to balloon power pistons for Stirling engines, I have standards above which, I will not go.
Read More..

Photography Improvised macro lens mould study

I got another lens from a junk bin in a camera store.

This one is a canon f 1.4, 35-80mm zoom.

It has an auto focus motor that makes a sound a bit like you might hear if you put a blender in a blender, but the auto focus still works.

The bits that dont work so well, are the lenses.


The problem is mould inside the lens.

Not uprising for a 500 Yen lens sitting in the junk bin of a camera store in the country that invented humidity.


Thats a ridiculously close up shot of the mould.

Ridiculously close up.


I dont have any way of doing macro shots with my new camera, so I had to improvise.

I took the shot of the mould with this home made bit of kit.

The blue lens cloth is there to keep the light out of the improvised macro lens, because the small length of toilet roll acting as an extension tube  isnt light tight.

The lens attached (thats a generous description) to the camera is actually on backwards, and is resting against the other end of the toilet roll tube.

The lens resting on the red kitchen scrubber is the new one with the mould garden inside.


The torch is a torch.

The torch is there because the cameras lens has the aperture set as small as it will go (f36) to try to get at least some of the mould in focus.

I didnt really achieve that.

The exposures were around 30 seconds long (many minutes without the torch), and other people were working in the house at the time. My desk is a wobbly kitchen table top heavy with old CRT computer monitors, and all the other junk I like to keep at hand. As as a result it amplifies any movement from people, traffic, and the fridge and freezer compressors.

If you put a glass of water on a desk like mine and look at the reflection, you will see the reflected image dance all over the place. Normally it isnt a problem, because the camera and lens would both move at the same time, but with this contraption, there was nothing of substance connecting the lens and the camera.

Tricky.

Anyway...

The lens has mould in it.

The image on the left was taken with the canon 18-55mm lens that came with the camera.

The image on the right is taken with the mouldy 35-80mm lens.

The camera was set to the same settings for both shots.


Mould is not a friend of the lens.

The point of all this, is to point out that I wont be taking an angle grinder to my lens in some future post  without reason.

Actually Ill try to open it up and clean it, but there is a fair chance its bits of glass are coated in a very delicate plastic coating, called coating. If thats the case the mould may have become a permanent fixture by etching its way into the coated bits.

The mould appears to be on only one element, so I might be able to salvage some other bits and make a proper, mould-free macro lens.


120 Things in 20 years warns that when I say "proper" I mean the improvised macro lens might employ slightly fewer toilet paper tubes, and where they are unavoidable, they might be made a bit less wobbly and light leaky.
Read More..

Photography My new macro bot

I built a thing today.

It moves stuff in small increments using a small electric motor, in response to a users input.

I guess that means Ive built my first robot.

Actually, probably my second.

Anyway...

My device looks like this


It also looks like this.

The bit with the "1" next to it is my previously built power supply that delivers 5 volts to my project.

The bit with a "2" next to it is the previously made PICAXE Proto Board that connects some input/output pins to my breadboard.

The "3" is the transistor bit, that powers the motor when the chip sends a signal to do so.

And the "4" isnt really visible. If you could see the "4", it would be next to the the switch that the user presses to make the subject move a tiny bit.

The point of this exercise is to attempt to make a device that carries an empty box of mints along a steady track, to carry a subject to different focal distances, in order to make a series of photos to create a focus stack, and thus create an image with a greater depth of field than might otherwise be achieved.

This absurdly simple solution, represents my first successful attempt at creating an electronic something without external help from someone, somewhere on the planet.

All the software does is wait for someone to press the button, then move the subject a tiny bit closer to the camera. This changes which bit of the subject is in focus, and enables the user to take a "stack" of pics, each one having a different plane in sharp focus. The user can then knit them all together using some free software, creating a photo with an otherwise impossible depth of depth of field.

The 11 lines of code that makes it work look like this (the very small amount of black text is the actual software, the green text is just my description of it)

--------------------------------------------------


; Macro Mover ver 2013 06 10 0200
        ;moves a small platform holding a photographic macro subject a tiny amount closer to the camera                    each time a button is pressed, helping to create a "focus stack"
;120thingsIn20Years.blogspot.com
;no rights reserved
;use at your own risk

;For picaxe 08M2

#No_Data saves a few seconds when uploading the code to the chip, because it doesnt have to check for data

main: begin the main program loop

if pinC.1 = 1 then gosub Move    if someone is pressing the button, jump to the bit of code called "Move"

goto main if it gets this far, go back to the start and check for a button press again

Move: the bit of code that moves the platform with the subject on it

do until pinc.1 = 0 :loop hang here until the button is released

high 2 turn on the motorconnected to pin 2
pause 2 wait for 2 milliseconds
low 2 turn off the motor connected to pin 2
pause 100 pause for 100 milliseconds

      return go back to the gosub that called the "Move" code

-------------------------------------------------


I started with an old CD ROM drive that I ripped all the interesting bits out of.

I think this is the original motor because it fits perfectly. This is the motor that made the laser head move from the centre to the rim. Now its the motor that moves the photographic subject towards the lens, changing which bit is in focus.
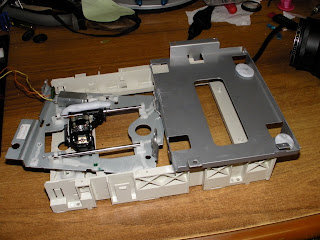
The blu-tac is there as a weight to keep the linear cog in contact with the gear that the motor connects to.


So the motor makes the black bit move from this extreme...

(see the black bit)


to this extreme, but in tiny increments each time the button is pressed.

Each button press causes a a quarter of a millimetre migration.

.25 mm = 0.0098 inches

A tiny amount each button press.

The camera sits on the large grey platform to the right.


The software controls how much the motor moves at any given moment. This way we control how much we increment the slice of our subject that is in crisp focus.

The camera is securely set in place because there is a tight fit due to my bending some tags in order to hug the camera. There is also two lumps of blu-tac securing the camera to the base.

This arrangement feels totally secure, and I havent had any problems with the camera moving.


Last, but far from least, I added a subject platform  and a light source. The subject sits on a platform made form an empty tic-tac (small mint confectionery) box,

The light source is the thing on three zebra legs.

Its best to move the light source with the subject as it moves toward, or away from the camera, to avoid photos with different exposures, so a light that moves with the subject is best.


Once you have a "stack" of photos with different bits in focus, you can knit them all together with a program like "MacroFusion" (free, open source program I run on my linux computer)

To use this Macro-bot device, you press down once or more times, on a button to move the subject a tiny bit closer to the camera. After each button press (or two or three) you take a photo. Each time you press the button, the subject moves a fraction of a millimetre. I found pressing the button once was suitable for macro shots where the lens was at full zoom, and pressing three times when the lens was at minimum zoom.

Some experimentation is required, but as soon as I made this, I immediately solved all the problems I was having with poor alignment of my photos in a focus stack.

Successful results to follow...


120 Things in 20 years - Sometimes, all you have to do to make a robot, is to replace all the bits from the robot you salvaged last week.


Read More..